What Equipment Is Needed for a Podcast in 2026
 August 8, 202623 Minutes
You're probably staring at a laptop, a note app, and a tab full of gear reviews, wondering why a simple podcast seems to require an audio engineering degree. It doesn't. What you need is a sensible setup, in the right order, for the kind of show you're making. If you get the room wrong, the rest of the gear gets expensive fast. If you get the format wrong, you'll buy things you won't use. For creators comparing DIY options with a studio like Flexwork Studios in Springfield, NJ, the smarter move is usually to start with the room, then build outward only if the show really needs it.
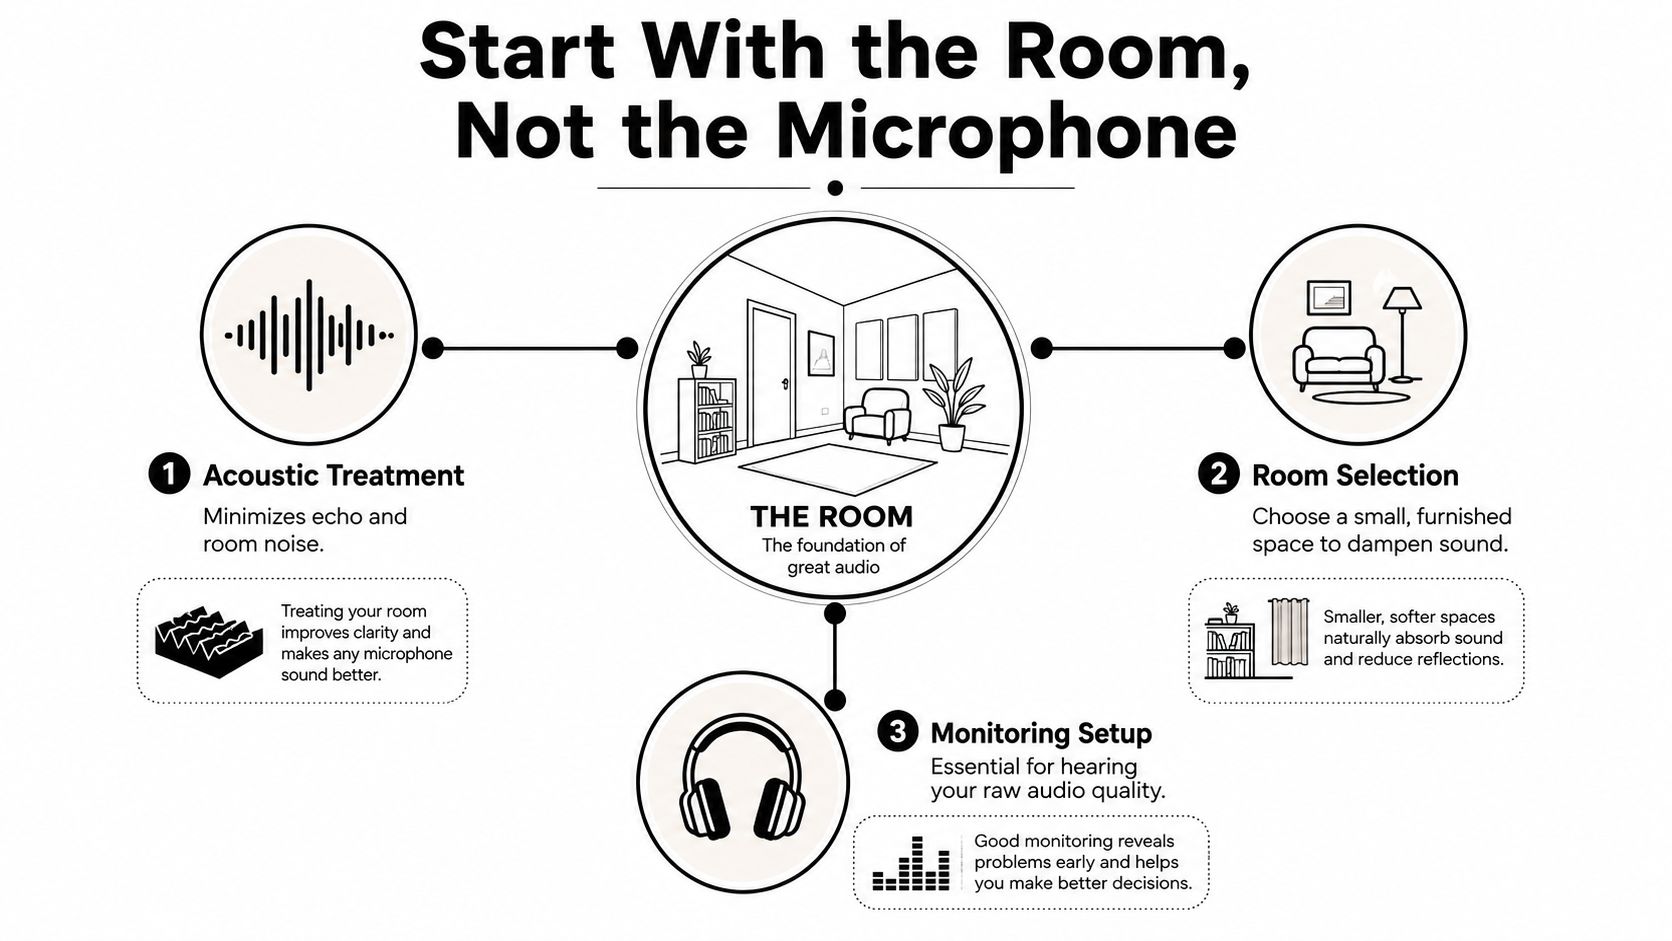
Start With the Room, Not the Microphone
The fastest way to waste money on podcast gear is to buy a shiny microphone before you've fixed the space around it. A quiet, treated room is the first piece of podcast equipment that matters, because a microphone can only capture what's already there. If the room is echoey, the file will sound echoey. If the HVAC rattles or traffic leaks through a window, the mic will record that too.
Soundproofing and treatment are not the same thing
Soundproofing keeps outside noise out. Acoustic treatment reduces reflections inside the room. Most beginners need treatment far more than they need a full soundproof build, because the common problem isn't silence, it's ugly reflections that make voices sound thin or boxy.
A closet full of clothes can be a usable first studio because fabric absorbs some reflections. A furnished room usually beats an empty one for the same reason. The worst choice in most homes is a large, bare room with hard surfaces, especially if it has windows, tile, or a lot of open space.
Practical rule: if you clap and hear a sharp slap back at you, the room is telling you to stop shopping for microphones and start fixing reflections.
If you want a deeper look at what helps a room behave, Flexwork's guide on how to soundproof a room is worth reading before you buy more hardware.
The four foundational items
Every serious starter setup comes down to four basics, microphone, headphones, recording software, and a quiet room. That's the answer to what equipment is needed for a podcast, not a shopping cart full of gadgets. Once those four are covered, everything else is a refinement.
For creators in apartments, shared homes, or office spaces across the New Jersey and New York metro area, room choice often matters more than the microphone itself. If your space is noisy, renting a studio that's already treated can save you from building a DIY setup that never sounds right. A better room usually beats a bigger gear list.
USB Versus XLR and Why the Choice Shapes Everything
Once the room is under control, the microphone path comes next. USB and XLR are not just two connector types. They shape your workflow, your upgrade path, and how much control you have over the recording.
USB keeps it simple
A USB microphone plugs straight into a computer and handles conversion inside the mic. That makes it the cleanest choice for a solo host, a beginner, or anyone who wants to start recording without buying extra hardware. If you are launching a straightforward audio show and want to keep the setup lean, USB is the sensible first buy.
That said, do not buy a USB mic because it looks easy on a product page. Buy one because your format is simple, your room is already usable, and you want to record without an interface, mixer, or a pile of cables. For a creator comparing microphone options, Flexwork's best microphone for podcast recording page is a practical place to check the fit before you spend money.
XLR gives you room to grow
An XLR microphone sends analog signal into an audio interface or mixer, which converts it to digital audio and gives you separate gain control per channel. That setup is the better fit for multi-host shows, guest-heavy rooms, and any production where control matters more than convenience. It is also the path I recommend if you expect the show to grow beyond one person at a desk.
XLR matters because it keeps the system modular. You can choose a better interface, add more channels, use better monitoring, and replace one piece without rebuilding everything. That is the smarter buy for a show with co-hosts, remote guests, or a more polished production style.
A mixed setup also makes sense. A host can start with one microphone path, then move into a more advanced rig later without throwing away the microphone. That is the safer route if you know the show format will change.
For anyone still deciding, a clear comparison of connector types is more useful than brand loyalty. A short visual guide, like this comparative infographic, helps you see the trade-offs fast. The decision is simple. Choose USB if you need speed and simplicity. Choose XLR if you want control, expansion, and a setup that can grow with the show.
The Core Signal Chain From Voice to File
A clean podcast setup follows a simple chain, voice, capture, transmission, conversion, processing, storage. If one piece is weak, the whole file suffers. Seasoned producers build the system first, then buy gear to fit it.
Start with mouth to mic distance
A boom arm or stand helps you hold a steady speaking distance of about 4 to 6 inches from your mouth (The Podcast Consultant podcast equipment guide). That consistency keeps your level and tone from drifting every time you lean in or pull back. It also makes editing easier because the recording stays more even from sentence to sentence.
A windscreen or pop filter belongs in this part of the chain too. Its job is to soften bursts of air before they hit the mic. It will not fix a bad room, but it will stop obvious plosives from ruining a take.
Conversion happens at the interface
If you're using XLR, the audio interface or mixer is the bridge between the microphone and the computer. A technically sound setup for multi-host or guest-heavy sessions uses one microphone per speaker, closed-back headphones for monitoring, and an interface or mixer when XLR mics are in play, because each channel needs its own gain control (Mackie podcast equipment checklist). That matters when one host laughs, gets loud, or leans in unexpectedly.
Closed-back headphones aren't optional in a serious same-room session. They let you hear what the mic is capturing without bleeding sound back into the room.
Software finishes the chain
Recording software is where the signal becomes a file you can edit, mix, and publish. For a creator who wants a simpler post-production path, a service like an automated podcast video generator can help turn finished episodes into social-friendly assets after the recording is done.
If you want a more advanced capture workflow, Flexwork's advanced recording techniques for improving your podcast sound quality page is useful context for anyone moving beyond a basic solo setup.
Matching Your Budget to Your Ambition
Budget advice gets sloppy fast. The right way to spend is simple. Start with the room, then the recording path, then the gear that matches your format. A solo audio show in a quiet room needs a very different buy list from a remote interview show or an in-person panel that may later add video.
A 2026 survey reports that beginner podcast setups can be built for under $100, while professional setups can exceed $2,500. It also shows where the money usually goes, microphone 40%, audio interface 20%, headphones 15%, acoustic treatment 15%, and accessories 10% (Podcast equipment survey 2026). That split is the part beginners miss. The mic gets attention, but the room and monitoring chain take a real bite out of the budget because they shape every recording you make.
Podcast Equipment Budget Tiers at a Glance
| Tier | Total Budget | Microphone | Interface or Mixer | Headphones | Acoustic Treatment | Accessories |
|---|---|---|---|---|---|---|
| Starter | Under $100 to about $209 | USB dynamic mic like Samson Q2U | Not required for USB | Basic closed-back headphones like Sony MDR-7506 | Quiet room, basic treatment if needed | Boom arm, foam windscreen |
| Mid | About $300 to $450 | Better mic | Optional or basic interface depending on format | Upgraded monitoring headphones | More serious treatment | Real boom arm, practical add-ons |
| Pro | Above $2,500 | XLR microphones | Multi-channel interface or mixer | Multiple headphone monitoring options | Treated space | Full studio accessories |
The survey's example starter build comes to about $209 using a Samson Q2U at $70, Sony MDR-7506 headphones at $99, a basic boom arm at $30, and a foam windscreen at $10 (Podcast equipment survey 2026). That is a sensible first cart for a solo host in a quiet room. It gives you a usable result without buying gear you cannot hear through properly.
A mid-tier setup, roughly $300 to $450, is where a lot of independent shows should land if they care about sound quality but do not want to build a full studio. You get better monitoring, cleaner mic placement, and enough room treatment to stop the space from working against you every session. The pro tier belongs to teams, high-volume shows, and creators who want a system that scales instead of a pile of mismatched gear.
If your show is video-first, add the camera only after the audio and room are under control. A useful camera guide for video podcasting will help you choose gear that fits the format instead of buying a camera because it feels like progress. For hosts who want to turn episodes into short clips without building a whole camera rig, an automated podcast video generator can handle repurposing after the recording is done.
When Video Gear Belongs in the Kit and When It Does Not
A camera is the fastest way to overspend on podcast gear. It feels like progress, so first-time hosts buy one before they have a stable room, a clean signal path, or a reason to publish video. Do the opposite. Decide the format first, then buy only what that format needs.
For podcast setups, the room comes before the camera. Audio-only shows, remote interviews, in-person conversations, and video-first productions each ask for a different kit, and cameras, lighting, and background control only make sense in the last two. Riverside podcast equipment guide breaks those setups out clearly, and that is the right order of thinking. A solo audio show for Spotify and Apple Podcasts does not need a dedicated camera. A remote interview show may only need a webcam and enough light to keep faces readable. A show built for YouTube, reels, and shorts needs a real video plan from the start.
Buy video gear only if the format pays for it
A video podcast adds work, not just hardware. You have to keep exposure steady, frame the shot properly, manage storage, and keep audio and video aligned. If the image looks polished but the clips drift out of sync, viewers notice right away. Entry into video usually means spending extra on a dedicated camera and lighting, not trusting a laptop camera to carry the show.
Use an automated podcast video generator only if your goal is repurposing finished episodes into clips, not pretending that clip output is the same thing as a real video production. It can help you decide whether your content plan needs a video stack at all. If the show is still audio-first, it usually does not.
If you are buying a camera because video feels like the next logical step, slow down and confirm the show will live on video platforms. A practical best camera for video podcasting guide is useful after that decision, because then the camera choice follows the format instead of driving it. That keeps you from spending on gear that only looks serious.
Don't confuse a clip strategy with a video show
A clip strategy is not the same thing as a full video production. Many creators only need enough visual coverage to cut promo assets for social, not a room full of cameras and lighting stands. That distinction saves money and keeps the build honest.
If the show is audio-first, buy for audio-first. If the show is meant to feed YouTube, shorts, or livestream distribution, video belongs in the kit from day one.
Software Workflow From Recording to Release
Gear only becomes a podcast when the software pipeline is in place. A mic without editing software is just a noisy input device. A recording without a publishing plan is a folder on your desktop.
The workflow is straightforward. Record the session, edit out mistakes and unwanted noise, mix and master the audio, export the file, upload it to a hosting platform, write the show notes, then schedule clips for social. If the show is remote, the recording platform matters too, because it needs to capture clean tracks from more than one person without drama.
Know which tool does which job
A digital audio workstation handles editing and mixing. A host-friendly recording platform handles remote sessions. A distribution service pushes the finished episode to places like Spotify, Apple Podcasts, and YouTube. Those are different tools, and they solve different problems.
That's why the equipment list doesn't end at the microphone. It ends when the episode is ready to release. If the host can't edit, the raw file still has to go somewhere. If the episode is strong but the workflow is broken, production bottlenecks pile up fast.
A great microphone doesn't rescue a missing editing plan. It just gives you a cleaner bad file.
For creators who would rather hand off the cut, Flexwork's editing and motion graphics services fit into the same workflow cleanly. The point isn't to own every tool. The point is to get the episode done well and on time.
Why a Studio Rental Can Replace the Gear List
A first podcast setup gets expensive fast if you start by buying gear. Rent the room first, and the list gets shorter immediately. A proper studio already gives you the part most beginners get wrong, the room. It also gives you the rest of the signal path in one place, which saves you from months of buying, testing, returning, and still sounding off.
A treated studio rental handles acoustics first, then the microphone, interface, headphone monitoring, and lighting. That matters because the room shapes the recording before the mic ever does. If you are still weighing a DIY setup against a pro room, start with this studio vs DIY podcasting comparison.
Match the format to the service
Different formats call for different support. A solo audio show does not need the same setup as a video podcast with guests, and a remote interview does not need the same room behavior as an in-person roundtable. Buy or rent for the format you will produce, not for the kit you wish you had.
For creators who want one record day to generate a lot of usable material, Flexwork's Content Day sessions are priced at $3,000 per day and include 20 edited reels or 60 pro photos. That makes sense for hosts who need one session to feed several channels. Podcast websites start at $5,000 plus hosting, which suits hosts who need a branded home for the show, not just a place to publish files.
For productions that need ongoing help, the Market, Manage and Produce My Podcast package starts at $1,500 per episode with a 20-episode growth commitment. That setup fits creators who care about consistency, distribution, and audience growth more than piecing together one-off recordings.
A solid podcast production service guide also helps hosts compare what they gain by handing off the work instead of building every part from scratch.
Buy the outcome, not the pile of gear
If your real goal is polished episodes without becoming your own studio tech, renting or booking production is the smarter move. You get a solved room, cleaner sound, faster turnaround, and less money tied up in hardware that sits unused.
Flexwork Podcast Studios offers that turnkey route for hosts who want to record, produce, and publish without building a home setup from scratch. If you are ready to stop guessing and start shipping episodes that sound polished from day one, visit Flexwork Podcast Studios and book a session that matches your format, budget, and growth plan.