
Podcast Microphone Setup for Studio-Quality Sound
 September 16, 202623 Minutes
You've bought the microphone, mounted it on a desk arm, and recorded what should be a polished episode. Then playback reveals a hollow room, sharp mouth sounds, fan noise, and a voice that somehow sits behind the music. The problem usually isn't the price or brand of the capsule. A professional podcast microphone setup is a chain, and every link matters, from the room and mic distance to gain, monitoring, and repeatable production.
This guide gives you a practical path from an empty desk to broadcast-ready capture. You'll learn how to choose USB, XLR, or hybrid microphones, position them for spoken word, prepare the room, manage levels, handle multiple hosts and remote guests, and decide when a studio rental or production package makes more sense than another gear purchase.
Why Your Podcast Audio Still Sounds Amateur
A creator can buy a condenser microphone, record in a familiar room, and still hear thin, reflective audio on playback. Condensers capture detail, including hard floors, windows, HVAC noise, keyboards, computer fans, and wall reflections. If the room rings, the microphone reproduces that room accurately.
Start with diagnosis, not another purchase. The familiar setup, a microphone on a boom arm, headphones on, and direct recording to a computer, already appeared as a common foundation in historical gear-survey data from 2018 and 2019 (Mix). The equipment is straightforward. Consistent technique determines whether it sounds professional.
Four checkpoints creators skip
Set gain before performance. Speak at your actual episode volume, including your loudest laugh and strongest emphasis. Set loud phrases near -18 dBFS as a working target. Podcast gain-staging guidance commonly places loud speech peaks around -6 dB, which leaves room before clipping.
Capture with production headroom. Record at 24-bit / 48 kHz. That format gives you practical editing flexibility and works well with video workflows (digital audio guidance). Clipped speech cannot be repaired cleanly later.
Remove noise at the source. Turn off nearby fans, move away from HVAC vents, isolate the desk, and keep the microphone close enough for the voice to dominate the room. Software cleanup should handle leftovers, not compensate for a noisy recording space.
Monitor before recording. Use closed-back headphones and test every input. A 2024 gear survey reported that 70.5% of podcasters recorded with headphones on, while 42.4% used dynamic microphones, reinforcing the practical value of monitoring and room-noise control (2024 podcaster gear survey).
Producer's rule: If the room, source, or signal chain is wrong, a more expensive microphone records those problems in greater detail.
Flexwork Podcast Studios provides acoustically treated rooms, professional interfaces, adjustable microphone arms, and engineer-led adjustments during recording. That support removes several common failure points before the session starts. For a solo creator testing a first show, a treated room can prevent unnecessary gear spending. For a team building a repeatable broadcast package, the controlled environment supports consistent episodes.
Creators documenting a video-first workspace or studio tour should also account for audio errors in photo tours. Clean images cannot compensate for distracting sound.
Choosing the Right Microphone for Your Show
You arrive at Flexwork Studios with a weekly solo show, a co-hosted interview series, or a video-first production plan. The right microphone depends on that workflow, not on a specification sheet. USB, XLR, and hybrid microphones serve different production ambitions.
Choose a USB microphone for a solo creator who records regularly and wants minimal setup friction. Connect it to the computer, select the input in your recording software, put on closed-back headphones, and record. USB suits an efficient Flexwork session when one speaker needs a fast, repeatable package with no separate interface.
Choose XLR when the show includes co-hosts, callers, multiple microphones, or mix-minus routing. The interface adds equipment, but it gives you better control over gain, monitoring, and input expansion. That makes XLR the practical Flexwork choice for producer-led recording and a broadcast package that needs to grow.
Hybrid models sit between those paths. A Shure MV7 or RØDE NT-USB+ works for a creator who wants straightforward USB recording now and a more flexible workflow later. Buy a hybrid only when you expect that workflow to change, not because “future-proof” sounds reassuring.
Microphone Choice by Show Format
| Microphone Type | Best For | Growth Ceiling | Flexwork Match |
|---|---|---|---|
| USB | Solo shows, weekly publishing, simple video capture | Limited expansion, fast deployment | Hourly rental for efficient recording sessions |
| XLR | Co-hosts, interviews, multi-mic productions | Strong routing and monitoring flexibility | Producer-led recording and multi-person sessions |
| USB/XLR hybrid | Creators between beginner and scalable workflows | Useful transition path | Test a more advanced workflow before committing |
| Dynamic | Untreated rooms, active desks, conversational broadcast voice | Strong source isolation | Treated studio sessions where close technique matters |
| Condenser | Controlled rooms and detailed vocal capture | More room-dependent | Studio recording or carefully treated home spaces |
Dynamic microphones usually make the safer choice in an untreated room because they reject more surrounding sound. Condensers capture finer vocal detail, but they demand better room control. At Flexwork Studios, that trade-off changes because acoustic treatment reduces the room's influence.
Use the microphone selection guide for podcast recording to compare models, then decide by room, format, and routing. Match the microphone to the complete broadcast chain, including the interface, monitoring, operator support, and recording environment.
Microphone Placement and Proximity
A creator can buy the right microphone and still produce thin, boomy, or echo-heavy speech. Placement determines how much direct voice, room sound, and handling noise enters the broadcast chain. Start with the microphone 6 to 12 inches from your mouth, slightly above or below mouth level. Aim it toward your voice, or turn it slightly off-axis to reduce reflections, reverberation, and plosives, following Shure microphone technique guidance.
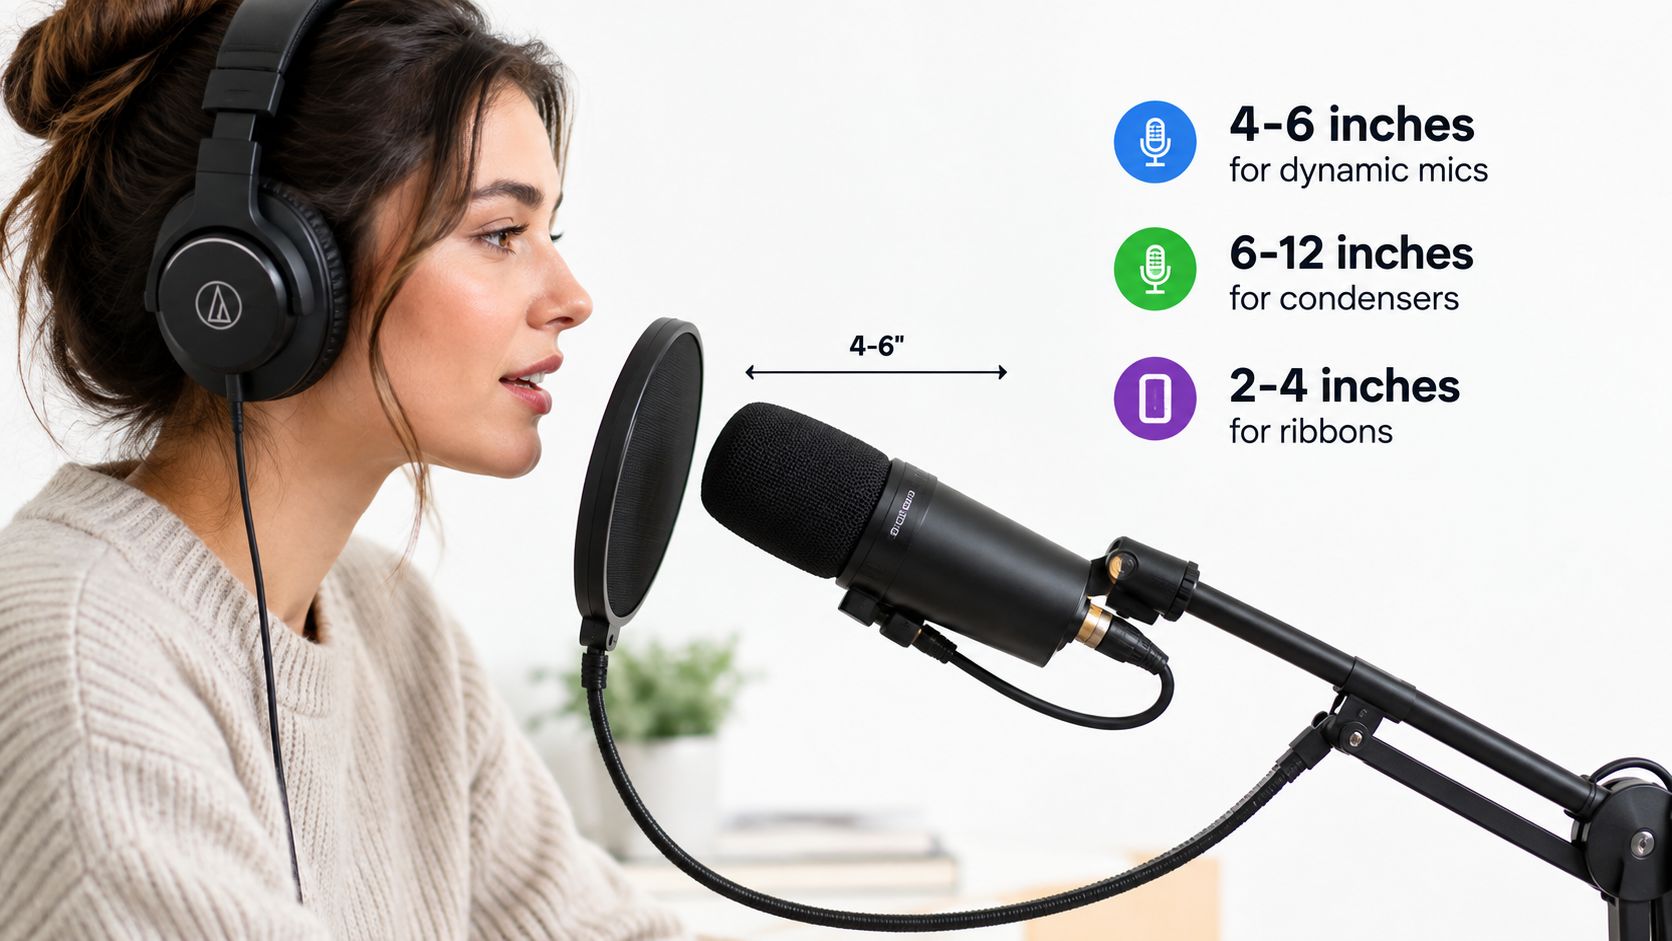
For a dynamic broadcast microphone, work closer, around 2 to 6 inches from the grille. A condenser generally performs better around 6 to 12 inches because its greater sensitivity captures more room sound. These distances are starting points, not fixed rules. Adjust until the voice stays present without excessive bass or audible reflections.
Make proximity work for you
Moving closer to a dynamic microphone increases warmth and low-end weight. That proximity effect can give a voice authority, but it can congest a bass-heavy speaker. Condensers provide a more open, detailed presentation, while their sensitivity makes room control more important.
Keep the capsule aimed at mouth level, then rotate the microphone slightly away from direct airflow. A pop filter handles bursts from “p” and “b” sounds. Off-axis positioning reduces the impact of those bursts on the capsule. A boom arm preserves distance between takes, and a shock mount limits vibration from desk movement, footsteps, or cable contact. Neither accessory can hide a desk удар during recording.
Test the setup before recording. Walk around, clap once, and listen for the strongest reflection. Treat that area rather than automatically covering the wall behind the camera.
Use this advanced recording technique guide to standardize placement across hosts, rooms, and video formats. That consistency helps match a simple Flexwork Studios session to a scalable, producer-led package.
Treating the Room Before You Press Record
Your microphone is only one link in the broadcast chain. If the room adds reflections, reverb, street noise, or low-frequency buildup, a premium capsule records those problems with greater detail. Fix the room before upgrading the microphone, especially for a Flexwork Studios setup where the right package should match the show's ambition.
Start with the first-reflection points. Use the mirror trick on both side walls, then place absorption where the microphone or speaker appears in the mirror from the listening position. Treat the ceiling above the microphone and the space between co-hosts when several voices share the room. The room acoustics guidance recommends 2-inch panels at reflection points and identifies reverb tails longer than 0.3 seconds as a reason to add absorption.
Prioritize what the microphone hears
Portable panels, gobos, curtains, rugs, and tightly packed bookshelves help when permanent installation is unavailable. Address corners because low-end buildup muddies speech. Cover or reposition around windows and bare floors, which produce strong reflections.
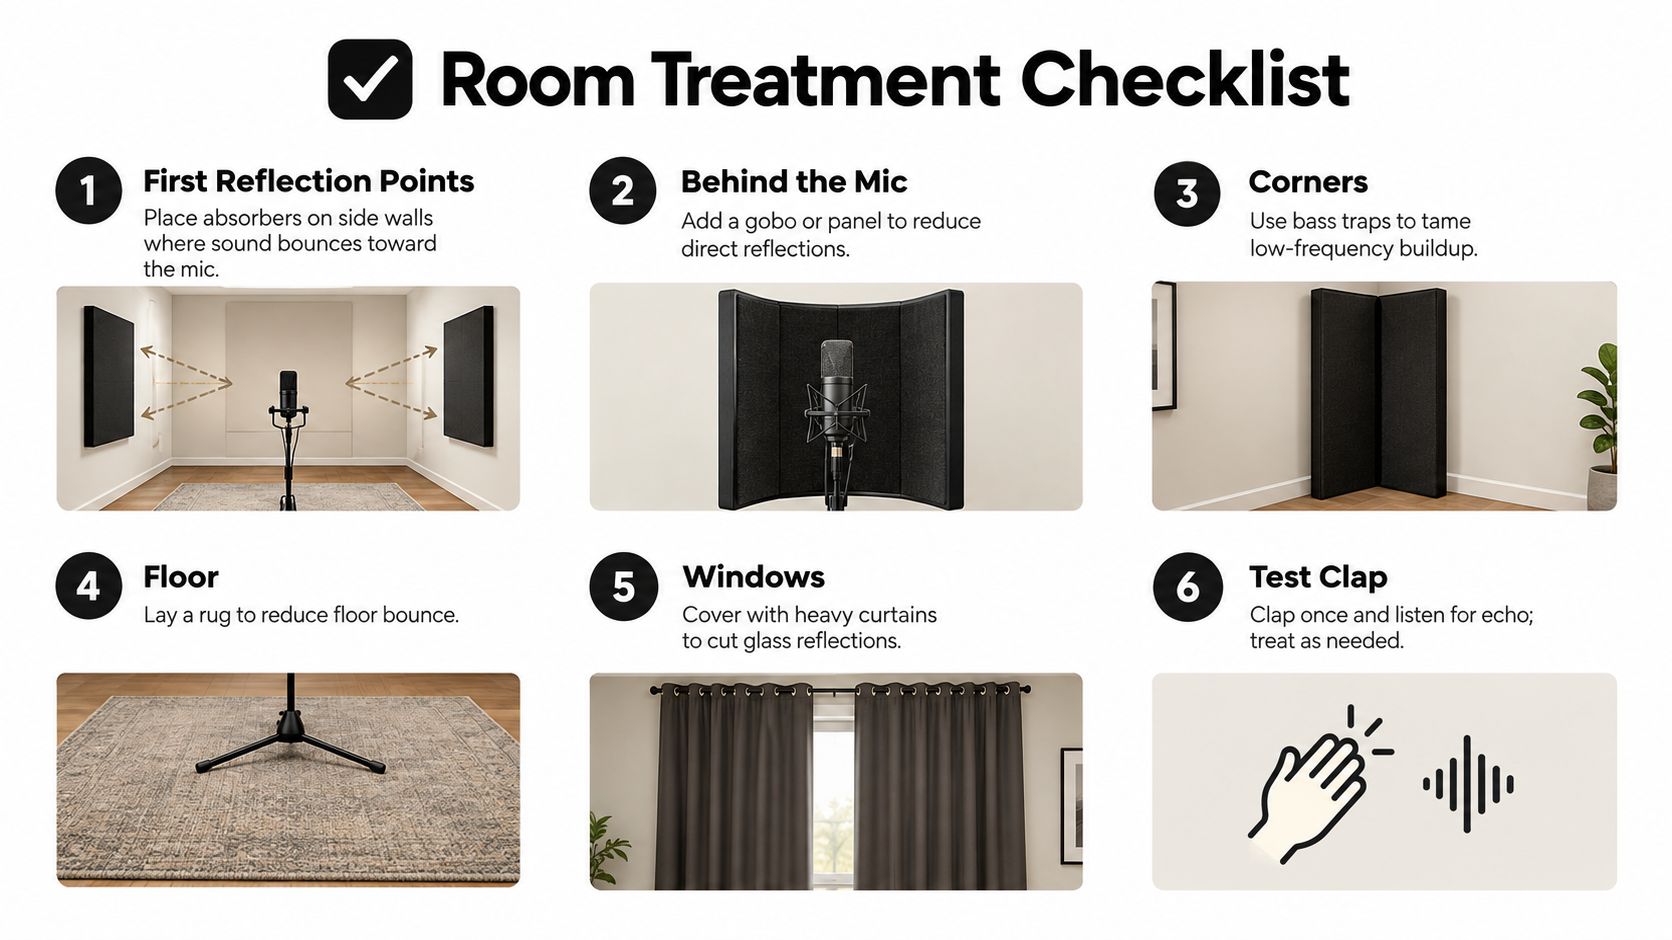
Run a silence test before every meaningful session. Record 30 seconds of silence, followed by 30 seconds of speech from the guest position. Listen on headphones for HVAC hum, computer noise, reflections, and tonal changes before recording the full take. If the room fails, move the microphone or treat the problem area first.
For a mobile setup, treat the space in front of the speaker, particularly when the microphone faces a reflective wall. The room does not need to resemble a recording facility. It needs to stop obvious echoes from returning to the capsule.
Read Flexwork's explanation of what acoustic treatment does before buying decorative foam. Thin foam can reduce some high-frequency energy, but it cannot provide the broad absorption needed for balanced spoken-word audio. Choose a simple treated setup for solo work, then book a producer-led Flexwork Studios package when multiple voices, video, or repeatable production standards justify it.
Signal Chain, Levels, and Software Settings
A professional podcast signal chain starts before the DAW. The capsule, cable or USB connection, preamp, interface, computer, headphones, and editing stage all affect the result. A weak component adds noise or leaves you compensating with heavy processing.
Dynamic broadcast microphones such as the Shure SM7B need substantial clean gain. Pair one with an interface that can supply it without excessive noise. A hybrid USB/XLR microphone makes solo recording easier, while its two outputs may provide different control and expansion options. Choose the package for the Flexwork Studios use case: USB suits a simple solo setup, while XLR supports additional microphones and more involved production.
Set the chain in order
Speak at the volume you will use during the episode. Set the input while delivering normal speech, laughter, and louder phrases, then adjust so peaks sit around -6 dB. That leaves practical room below clipping without forcing the recording level too low.
Closed-back headphones prevent guest audio from leaking back into the microphone. Disable operating-system alerts, email sounds, playback audio, and automatic processing until you know what each tool is doing. Noise reduction belongs in editing, not as a substitute for controlling the recording environment.
| Component | Target Setting |
|---|---|
| Recording depth | 24-bit |
| Sample rate | 48 kHz |
| Input gain | Loudest speech around -6 dB |
| Monitoring | Closed-back headphones |
| Processing | Record clean, process after capture |
| Connection | USB for simplicity, XLR for expansion |
The 24-bit / 48 kHz format gives editors useful flexibility and suits video production. It cannot fix a poor room or distorted input, so set the microphone and gain correctly first.
As the show grows, select an interface by source count, headphone monitoring, and routing needs. Use this guide to compare audio interfaces for recording. Solo creators need simplicity. A multi-mic Flexwork Studios package needs independent inputs and monitoring that can handle every speaker reliably.
Multi-Mic Setups and Remote Guest Workflows
A solo recording can conceal weak routing and monitoring. Add a co-host or remote guest, and phase, bleed, latency, and track assignment become immediate production problems. Treat the microphone as one part of the broadcast chain, then choose the Flexwork Studios setup that matches the show you plan to make.
For in-person co-hosts, use similar microphone types whenever possible. Keep at least 12 inches between capsules to limit comb filtering, and place individual gobos between speakers when the room needs more separation. Each person should stay on their own microphone instead of turning toward the other speaker mid-answer.

Choose the workflow by production need
A two-person studio conversation needs matched microphones, separate headphone mixes, and an interface with independent inputs. A remote interview needs local capture at both locations, a dependable session bridge such as Riverside or SquadCast, and monitoring that keeps the guest from hearing a delayed copy of their own voice.
Remote platforms that record each side locally can preserve quality when the live connection struggles. They still need a backup. Record a stereo safety feed on the host interface whenever the session matters, and review the routing before the guest joins. See how to host remote guests from a NJ podcast studio in this hybrid podcasting guide.
Set local speech around -18 dBFS and remote returns around -24 dBFS, according to the specified remote-guest workflow. The lower return level gives the host room to hear the guest without making the monitor mix aggressive.
Monitoring rule: If the host cannot hear the guest clearly before recording, the editor inherits a problem that no microphone upgrade can solve.
Use mix-minus routing for remote sessions. Send the guest the host and program feed, while removing the guest's own delayed signal. Give each in-person host an individual headphone mix, and do not send a microphone back to its own speaker unless the monitoring system is designed for it.
Diagnose the actual bottleneck
A better microphone will not correct a weak chain. Check these points in order:
- Source control: Keep the speaker close, maintain the angle, use a pop filter, and watch plosives and sibilance.
- Room control: Listen for reflections, reverb, HVAC noise, desk vibration, and low-frequency rumble.
- Signal integrity: Check cables, interface routing, clocking, buffer settings, and track assignment.
- Monitoring: Keep headphones on to catch a loose cable, accidental mute, or noisy return immediately.
- Verification: Record a short silence test at every session, then listen before the full conversation begins.
A de-esser can manage excessive sibilance after capture, while correct microphone angle and a pop filter provide better protection against plosives. Balanced XLR runs can reduce hum. Use a ground lift only when it is safe and appropriate. Closer placement and broader absorption address room rumble more effectively than buying a brighter microphone.
A practical podcast setup guidance sequence is straightforward: quiet the source, move the microphone close enough for the voice to beat the room, isolate the desk, record a short sample, and decide on new gear only after listening. Flexwork Podcast Studios already configures the room and capture chain for podcast and video production, so creators can focus on performance, whether they need a simple co-host setup or a more demanding remote workflow.
Studio Scenarios and Booking Your Tour
Choose the studio package around the show you are producing, because the microphone is only one part of the broadcast chain. Flexwork Studios lets creators match room, routing, monitoring, and production support to the ambition of the format.
A solo interview creator needs one focused microphone, reliable headphones, a clean interface, and a controlled booth. A co-hosted show requires matched dynamics, separate monitoring, and a caller return path. Remote-heavy production calls for isolated tracks and local capture. Panel discussions need enough matched inputs, redundant recording, and producer oversight so several voices remain clear.
Flexwork Package Comparison by Show Type
| Package | Best For | Mic Setup |
|---|---|---|
| Essentials | Solo interviews and straightforward episodes | One condenser, interface, and acoustically treated booth |
| Signature | Co-host shows and caller-supported formats | Matched dynamics, individual headphone mixes, and return feed |
| Pro | Remote-heavy productions | Multi-channel routing, local guest capture, and isolated post-production tracks |
| Enterprise | Multi-host panel discussions | Four matched microphones, redundant recording, and producer monitoring |
Booking should also reflect how much content each session must produce. Hourly rentals suit creators who already know their workflow and need a dependable room without building one at home. Producer packages fit teams that need recording support, editing, visual storytelling, and consistent publishing.
For a larger content sprint, Flexwork's Content Day is $3000 per day and includes 20 edited reels or 60 professional photos. A podcast website is $5000 plus hosting, while the Market & Manage tier starts at $1500 per episode with a 20-episode growth commitment. These services extend the broadcast chain beyond the microphone, turning one recording workflow into a repeatable content system.
Book a tour before committing to another home-rig compromise. Speak in the room using your actual delivery, check the headphone mix, confirm camera framing, and test the configuration you plan to use. Choose the package that supports your next stage, not only your last episode.
Flexwork Podcast Studios provides treated podcast and video rooms, broadcast-ready microphones, professional interfaces, engineer support, production packages, Content Day sessions, and podcast websites. Visit Flexwork Podcast Studios to tour the space, test your podcast microphone setup, and book the workflow that fits your show's ambition.