

How to Record a Podcast: Step-by-Step Pro Workflow
Meta description: Learn how to record a podcast with a professional workflow that improves audio quality, streamlines production, and builds a stronger brand.
URL slug: /how-to-record-a-podcast-pro-workflow
Primary keyword: how to record a podcast
Secondary keywords: podcast recording workflow, podcast audio quality, professional podcast studio
You’re probably already doing the hard part. You have the point of view, the stories, the guests, the business case, and the consistency to keep showing up.
Then you listen back to your episode and hear a different reality. The room sounds hollow. Your voice jumps in volume. Your guest sounds like they’re calling from a kitchen. The content is strong, but the delivery lowers trust before your ideas even land.
That gap matters. Podcasts lose 20% to 35% of listeners within the first five minutes according to Riverside’s podcast analytics breakdown. If your recording feels off at the start, people leave before your best insight arrives. That’s why learning how to record a podcast isn’t a gear hobby. It’s a brand decision. If you’re still weighing where podcasting fits in your broader content mix, this breakdown of podcasting vs other forms of content creation is a useful place to calibrate.
Your Podcast Deserves to Be Heard Not Just Made
A lot of smart creators hit the same wall.
They launch with momentum. They buy a mic, clear an hour on the calendar, and start publishing. On paper, everything looks right. In practice, the show still sounds tentative. Not because the host lacks authority, but because the recording does.
That’s the hidden tax of amateur capture. Listeners don’t separate your insight from your sound. They experience them as one thing. If the audio feels thin, distracting, or inconsistent, your brand feels that way too.
A polished show creates a different first impression. You sound prepared. You sound credible. You sound like someone worth following.
Your audience can forgive a small stumble. They won’t forgive audio that makes them work to keep listening.
Recording well is the first professional habit. Not editing. Not promotion. Not clip strategy. Capture comes first.
The DIY Ceiling Why Great Ideas Get Lost in Bad Audio
Most podcasts start at a desk.
That’s not a problem by itself. Plenty of great shows begin in a spare bedroom or home office. The problem starts when creators confuse owning gear with having a recording process.

A decent mic in a bad room still produces bad audio. A talented host with inconsistent levels still sounds unpolished. A strong interview recorded through weak monitoring still creates editing headaches later.
If you’ve ever finished a session and thought, “I’ll fix it in post,” you’ve already found the DIY ceiling.
The room is usually the first enemy
Creators love to obsess over microphones because gear is tangible. Room sound is less glamorous, which is exactly why it gets ignored.
Hard surfaces reflect your voice back into the mic. Walls close to your desk create slap and bounce. Empty rooms exaggerate that problem. Even a strong performance can end up sounding cheap because the space is working against it.
One of the simplest fixes has nothing to do with buying more foam. In non-studio setups, speaking directly toward a wall can create major reflections, and orienting your desk at an angle to the wall can improve vocal clarity by up to 45%, according to this podcast room reflection discussion on YouTube.
That’s a useful reminder. Technique beats random purchases.
If your recordings feel boxy or echoey, start with orientation, distance from walls, and what’s around you. Then review more practical improvements in this guide on how to improve audio quality.
Expensive gear won’t save weak technique
Creators often make the same upgrade mistake. They buy a better microphone before they fix mic placement, gain, monitoring, and speaking consistency.
That usually creates a more expensive version of the same problem.
Here’s what weak technique sounds like in real life:
- Inconsistent mic distance: You lean back to laugh, turn to check notes, then come in too close on the next point.
- Poor speaking angle: You talk straight into the capsule and trigger harsh plosives on P and B sounds.
- No live monitoring: You don’t hear the hum, mouth noise, cable issue, or clipping until the session is over.
- Unstable environment: HVAC noise, desk vibration, keyboard taps, and hallway sound all sneak into the take.
A great host can still lose authority when every sentence sounds different.
DIY setups create hidden burnout
The problem isn’t only quality. It’s energy.
When recording takes too much troubleshooting, creators start dreading their own workflow. They spend more time testing software, muting notifications, adjusting levels, and apologizing to guests than hosting.
That drag shows up on camera and in conversation. The episode feels tighter when the host isn’t mentally managing ten technical variables at once.
Practical rule: If setup stress is affecting your performance, your setup is no longer “good enough.”
This often causes a lot of promising shows to stall. Not because the creator ran out of ideas, but because the process got clumsy and the results stayed uneven.
Remote guests make the gap wider
Home setups get even shakier once guests enter the picture.
A solo episode can tolerate a few imperfections. An interview can’t. You’re suddenly dealing with another person’s microphone, room, internet, confidence level, and technical habits. If your own workflow isn’t tight, guest episodes expose every weakness.
That’s why professional podcasting isn’t just about sounding better. It’s about reducing variables.
Here’s a simple comparison:
| Setup reality | What usually happens |
|---|---|
| Untreated room | Voice sounds roomy, distant, or reflective |
| No pre-call prep | Guest arrives confused, late, or poorly equipped |
| Single mixed recording | Editing gets harder because mistakes share one track |
| No producer mindset | Host juggles content and tech at the same time |
| Reactive workflow | Every episode starts from scratch |
The creators who level up aren’t always more talented. They’re more repeatable.
A repeatable recording workflow protects your voice, your time, and your reputation.
Your Professional Recording Workflow Before You Press Record
Good recording starts before the software opens.
The strongest podcast sessions feel effortless because the hard decisions were made earlier. Topic, structure, guest prep, environment, levels, backups. None of that should be improvised.
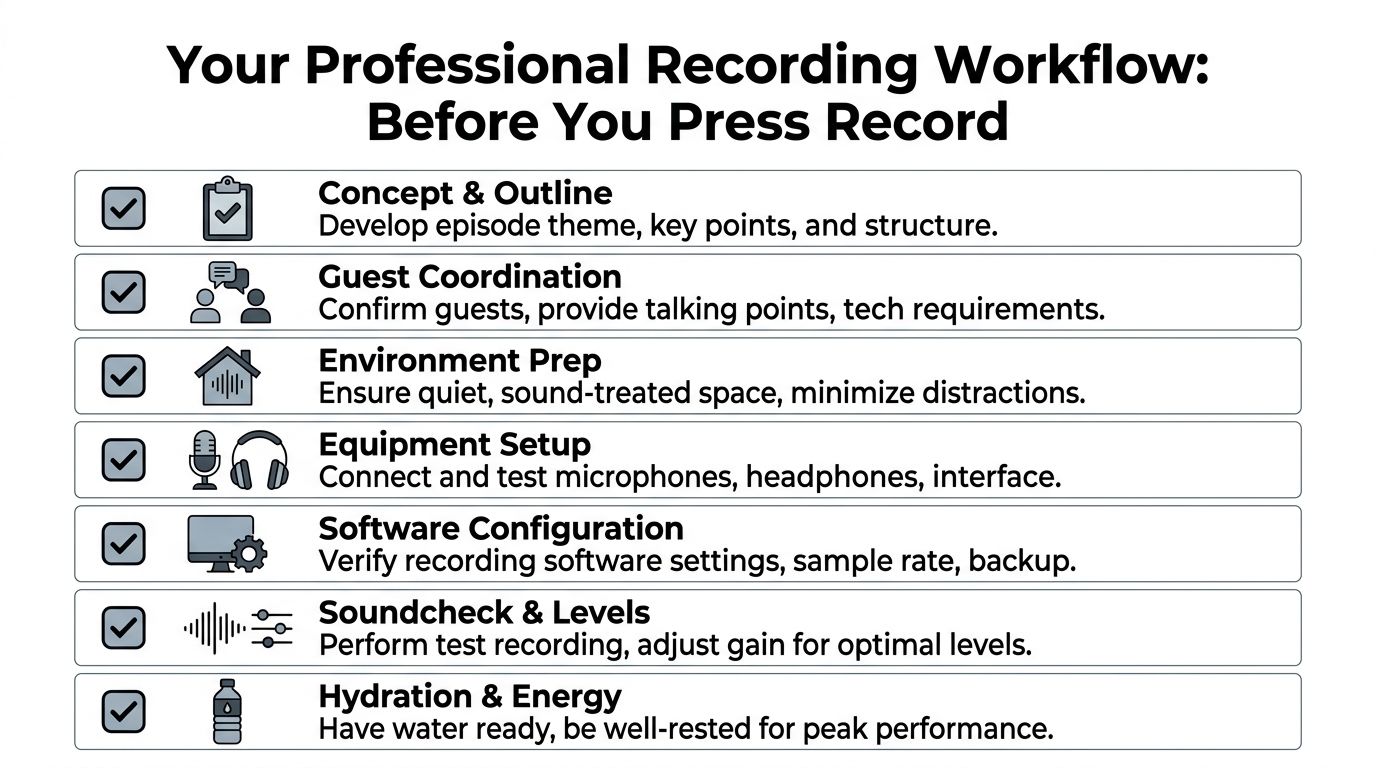
If you want to know how to record a podcast like a serious operator, use a workflow that removes friction before the first word is spoken.
Start with an episode brief, not a vague idea
Don’t sit down and “see where it goes.” That’s how you get rambling intros, soft openings, and dead-end tangents.
Write a one-page episode brief with:
- Core angle: What’s the single idea this episode needs to deliver?
- Listener takeaway: What should someone know, feel, or do after listening?
- Segment flow: Intro, main discussion points, examples, closing CTA.
- Guest prompts: Short questions that create stories, not yes-or-no answers.
- Boundaries: Topics to avoid, names to confirm, and offers to mention accurately.
This doesn’t kill spontaneity. It protects it. The host who’s prepared can listen instead of panicking about what to ask next.
Prep your guest like a producer
Guests don’t automatically know how to help you make a strong episode.
Tell them what to expect. Send a short message the day before recording with the session time, estimated length, preferred headphones, room guidance, and what kind of conversation you’re aiming for.
Keep it concise. You’re not writing a manual. You’re reducing confusion.
A strong guest prep note includes:
- Tech expectations: Use headphones if possible, silence notifications, close extra tabs.
- Room guidance: Pick a soft, quiet space and avoid empty kitchens or conference rooms.
- Content guidance: Share the topic and a few directional questions.
- Arrival guidance: Join early enough for a soundcheck.
That small step changes the tone of the entire session. Guests arrive more relaxed, and you spend less time cleaning up avoidable mistakes.
Choose the right recording environment
You have two real options. Improve your home setup or record in a controlled studio.
Both can work. The question is whether your current environment supports consistency.
Use this decision lens:
| If this sounds like you | Better choice |
|---|---|
| You have a quiet room, stable setup, and can keep it assembled | Home workflow |
| You record occasionally and want low overhead | Home workflow |
| You record with guests, video, or branded content regularly | Studio workflow |
| You’re tired of solving acoustic problems every week | Studio workflow |
| You want one session to produce long-form and clips efficiently | Studio workflow |
A home setup should be treated like a system, not a pile of devices. A studio should be treated like a production asset, not a luxury.
For creators who want a turnkey room, professional gear, and a cleaner capture process, Flexwork Podcast Studios offers acoustically treated recording spaces and production support in Springfield, NJ.
Keep your gear chain simple
You do not need a complicated signal path.
What you need is a setup you understand well enough to repeat under pressure. That usually means:
- Microphone: A directional mic with a cardioid pickup pattern
- Headphones: Closed-back headphones for monitoring
- Interface or recorder: One that gives you dependable input control
- Recording software: A DAW or remote platform you’ve already tested
- Backup plan: A secondary recording whenever possible
Complexity is seductive because it feels professional. In reality, simplicity is what keeps sessions clean.
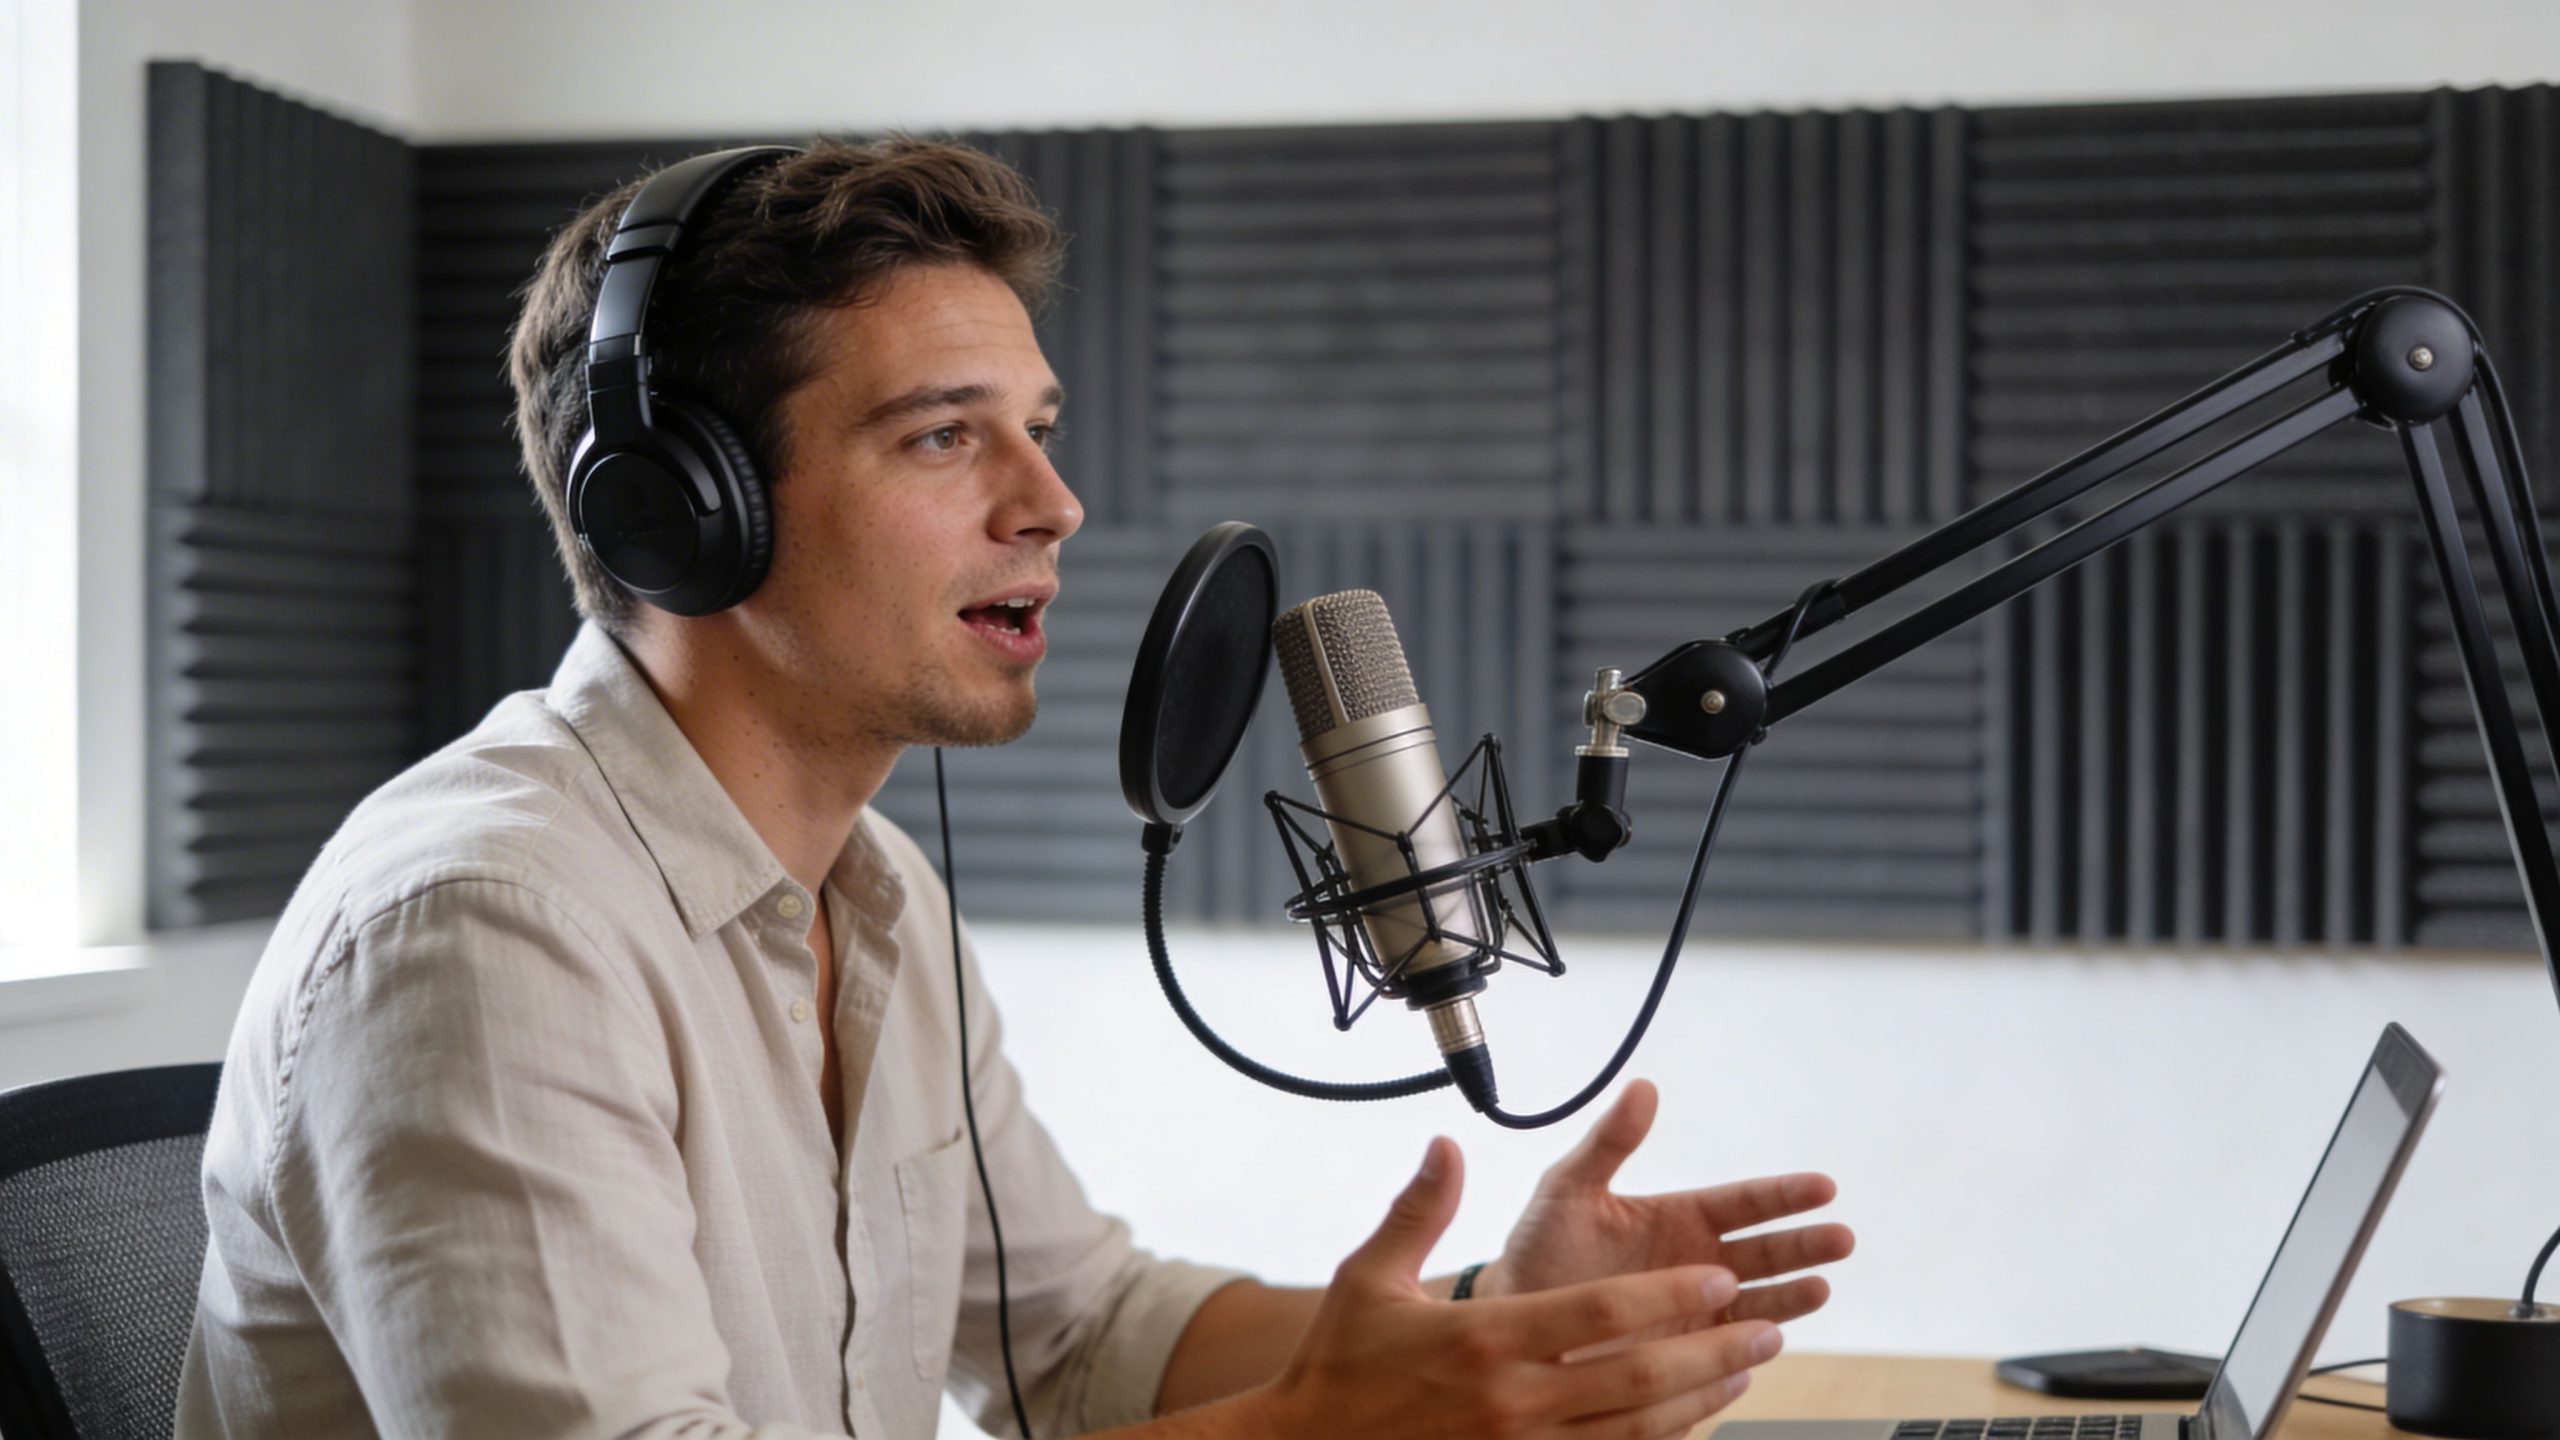
Master microphone technique before you buy anything else
Mic technique changes your sound immediately.
A directional cardioid mic captures most strongly from the front and rejects more sound from behind. That only helps if you use it correctly. Top-address mics need you to speak into the top. Side-address mics need you to speak into the side. Too many creators get this wrong and wonder why the audio sounds weak.
Your baseline setup should look like this:
- Place the mic about 6 to 12 inches from your mouth.
- Angle it at 45º so you’re speaking across it, not blasting straight into it.
- Stay in one posture and avoid drifting off-axis.
- Use a pop filter if your plosives are aggressive.
- Keep water nearby so mouth noise doesn’t get worse mid-session.
That 45º angle matters because it reduces plosives and harsh air hits without forcing your voice to sound distant.
The mic should hear your voice, not your breath.
Set gain correctly and stop clipping your audio
Amateur recordings often fall apart here.
Audio engineers consistently stress that gain staging matters because clipped audio can’t be cleanly restored later. Set your recording levels so normal speech averages between -18 to -12 dB RMS, with peaks never exceeding -6 dB, as outlined in Fireside’s recording best practices.
That number isn’t trivia. It’s your safety margin.
Use this quick reference:
| Meter behavior | What it means | What to do |
|---|---|---|
| Too low | Thin signal, more noise when boosted later | Raise input gain modestly |
| Healthy average | Clear capture with headroom | Leave it alone |
| Peaks near the top | You’re close to clipping | Lower gain |
| Red or overloaded signal | Distortion is already happening | Stop and reset immediately |
Run a short test with your actual speaking voice, not your polite setup voice. People always speak louder once the conversation starts.
Configure software like you expect failure
Professional recording means assuming something could go wrong.
That doesn’t make you paranoid. It makes you prepared.
Before each session:
- Confirm the input source: Make sure the software sees the correct microphone.
- Name the session properly: Episode title, date, guest name.
- Check local recording: If you’re recording remotely, use a platform that captures separate tracks when possible.
- Create a backup: Secondary device, duplicate software path, or cloud backup.
- Silence interruptions: Phone, desktop alerts, auto-updates, browser tabs.
This process is how polished teams separate from chaotic ones. They don’t trust memory. They use a checklist.
Build a pre-record ritual
A professional workflow isn’t only technical. It’s physical.
Your voice performs better when your body isn’t fighting you. Don’t start cold, dehydrated, rushed, or distracted.
Use a simple pre-session reset:
- Hydrate: Keep water close, not across the room.
- Warm up: Read a few lines out loud to settle your mouth and pacing.
- Clear the desk: Remove noisy objects, wrappers, and loose papers.
- Close loops: Finish urgent texts and emails before recording.
- Set intention: Decide the tone. Sharp, conversational, direct, high-energy.
This matters more than most creators admit. The microphone picks up tension fast.
Use a real start procedure
Don’t count down and wing it. Start the same way every time.
My preferred sequence is short:
- Confirm everyone can hear clearly.
- Do a brief level check.
- Record a short test.
- Listen back for room tone, hum, and voice balance.
- Re-state the opening line with confidence.
- Begin the actual take.
That structure sounds small. It saves sessions.
If your current approach is “hit record and hope,” tighten it. That’s the difference between random output and reliable production.
The Art of the Capture In-Session Recording Techniques
Once the session starts, your job changes.
Pre-production is about control. Recording is about awareness. You need to host well, keep the energy moving, and protect the quality of the capture at the same time.
Great in-session technique feels calm from the outside. Underneath, it’s disciplined.
Monitor live or accept surprises later
Wear closed-back headphones and listen.
You’re not monitoring for aesthetic perfection. You’re catching practical failures in real time. Buzzing cable. Shirt rubbing the mic. Mouth clicks. Laptop fan. Guest fading in and out. One side suddenly louder than the other.
If you don’t monitor, post-production becomes detective work.
Live note: If something sounds wrong in your headphones, stop early. Five seconds of interruption beats an unusable hour.
Protect your mic distance
Most hosts ruin consistency with body language.
They get excited and lean back. They turn to a side monitor. They glance at notes and drift off-axis. Every movement changes tone and level. Your editor hears every one of them.
Keep these habits during the conversation:
- Stay anchored: Sit in a position you can maintain.
- Turn your eyes, not your shoulders: Read notes without rotating away from the mic.
- Laugh responsibly: Pull back slightly if needed, then return to position.
- Pause, then restart: Don’t bulldoze through obvious mistakes.
This is especially important if you record video too. Big physical movements don’t just affect audio. They make your clips harder to cut cleanly.
Record each speaker separately when possible
For interviews, separate tracks are the standard.
A single mixed file gives you fewer options. If the guest coughs over your line, if one speaker is too quiet, or if a noise hits one mic, you’re stuck working around it. Separate tracks let you adjust each voice independently.
If you record remote conversations, prioritize platforms or workflows that preserve local or multitrack capture. That keeps internet instability from defining your final sound.
For note-taking after the session, a simple tool that can record audio and transcribe can help you mark quotes, episode titles, and clip moments faster without interrupting the live discussion.
Direct the room without killing the vibe
A strong host doesn’t act like a passive participant. You’re also producing.
That means giving clean direction when needed:
- Ask a guest to repeat a line if their answer was strong but the wording got muddy.
- Pause briefly if a siren, cough, or interruption blows up the moment.
- Clarify names, companies, and titles on the record so editing is faster later.
- Use verbal markers like “let me ask that again” instead of speaking over a mistake.
You don’t need to be stiff. You need to be intentional.
A lot of creators think professionalism makes a podcast feel less human. The opposite is true. Good production protects the conversation so the humanity comes through clearly.
Use silent communication in shared sessions
If you’re in person with a co-host, guest, or producer, stop talking over the room for every tiny issue.
Use simple nonverbal cues. Point to the mic if someone drifts too far. Hold up a finger if you need a beat. Nod to keep momentum. Gesture for water, reset, or wrap.
That keeps the atmosphere fluid and saves time in the edit.
For hosts who want stronger guest conversations overall, these podcast interview tips are worth reviewing before your next session.
Frame for repurposing, not just the full episode
If video is part of your strategy, don’t treat it like an afterthought.
Your framing should support the long-form episode and the short clips you’ll cut later. Keep the background clean, eye lines natural, and composition stable. Don’t force dramatic camera movement if your real goal is usable talking-head content for Reels, Shorts, and LinkedIn snippets.
A simple in-session checklist helps:
| Element | What to watch |
|---|---|
| Audio sync | Confirm audio and video stay aligned |
| Framing | Keep headroom and eyeline consistent |
| Lighting | Avoid shifts caused by windows or auto settings |
| Clip moments | Flag strong one-liners and reactions live |
| Visual noise | Remove distracting desk clutter and movement |
The creators who grow fastest from one recording session think in formats. Full episode. Clips. Trailers. Pull quotes. Newsletter excerpt. That mindset starts during capture, not after.
From Raw Files to Polished Episode When to Go Pro
Recording is only half the job.
A lot of creators feel relieved once the session ends, then immediately create a new mess with file sprawl, vague naming, no backup, and an editing backlog they don't want to handle.
Raw files are not a finished product. They’re ingredients.
Handle the files properly right away
The first few minutes after a session matter more than people think.
Before you move on to the next task:
- Rename everything clearly: Show name, episode number, guest, date.
- Back up immediately: Local drive plus cloud storage is the safer habit.
- Save session notes: Mark strong moments, retakes, sponsor reads, and problem spots.
- Export transcripts or rough notes: This helps editing, clips, and titles later.
- Share assets cleanly: Don’t make collaborators hunt through random folders.
This is unglamorous work. It’s also the difference between a smooth post-production cycle and total chaos a week later.
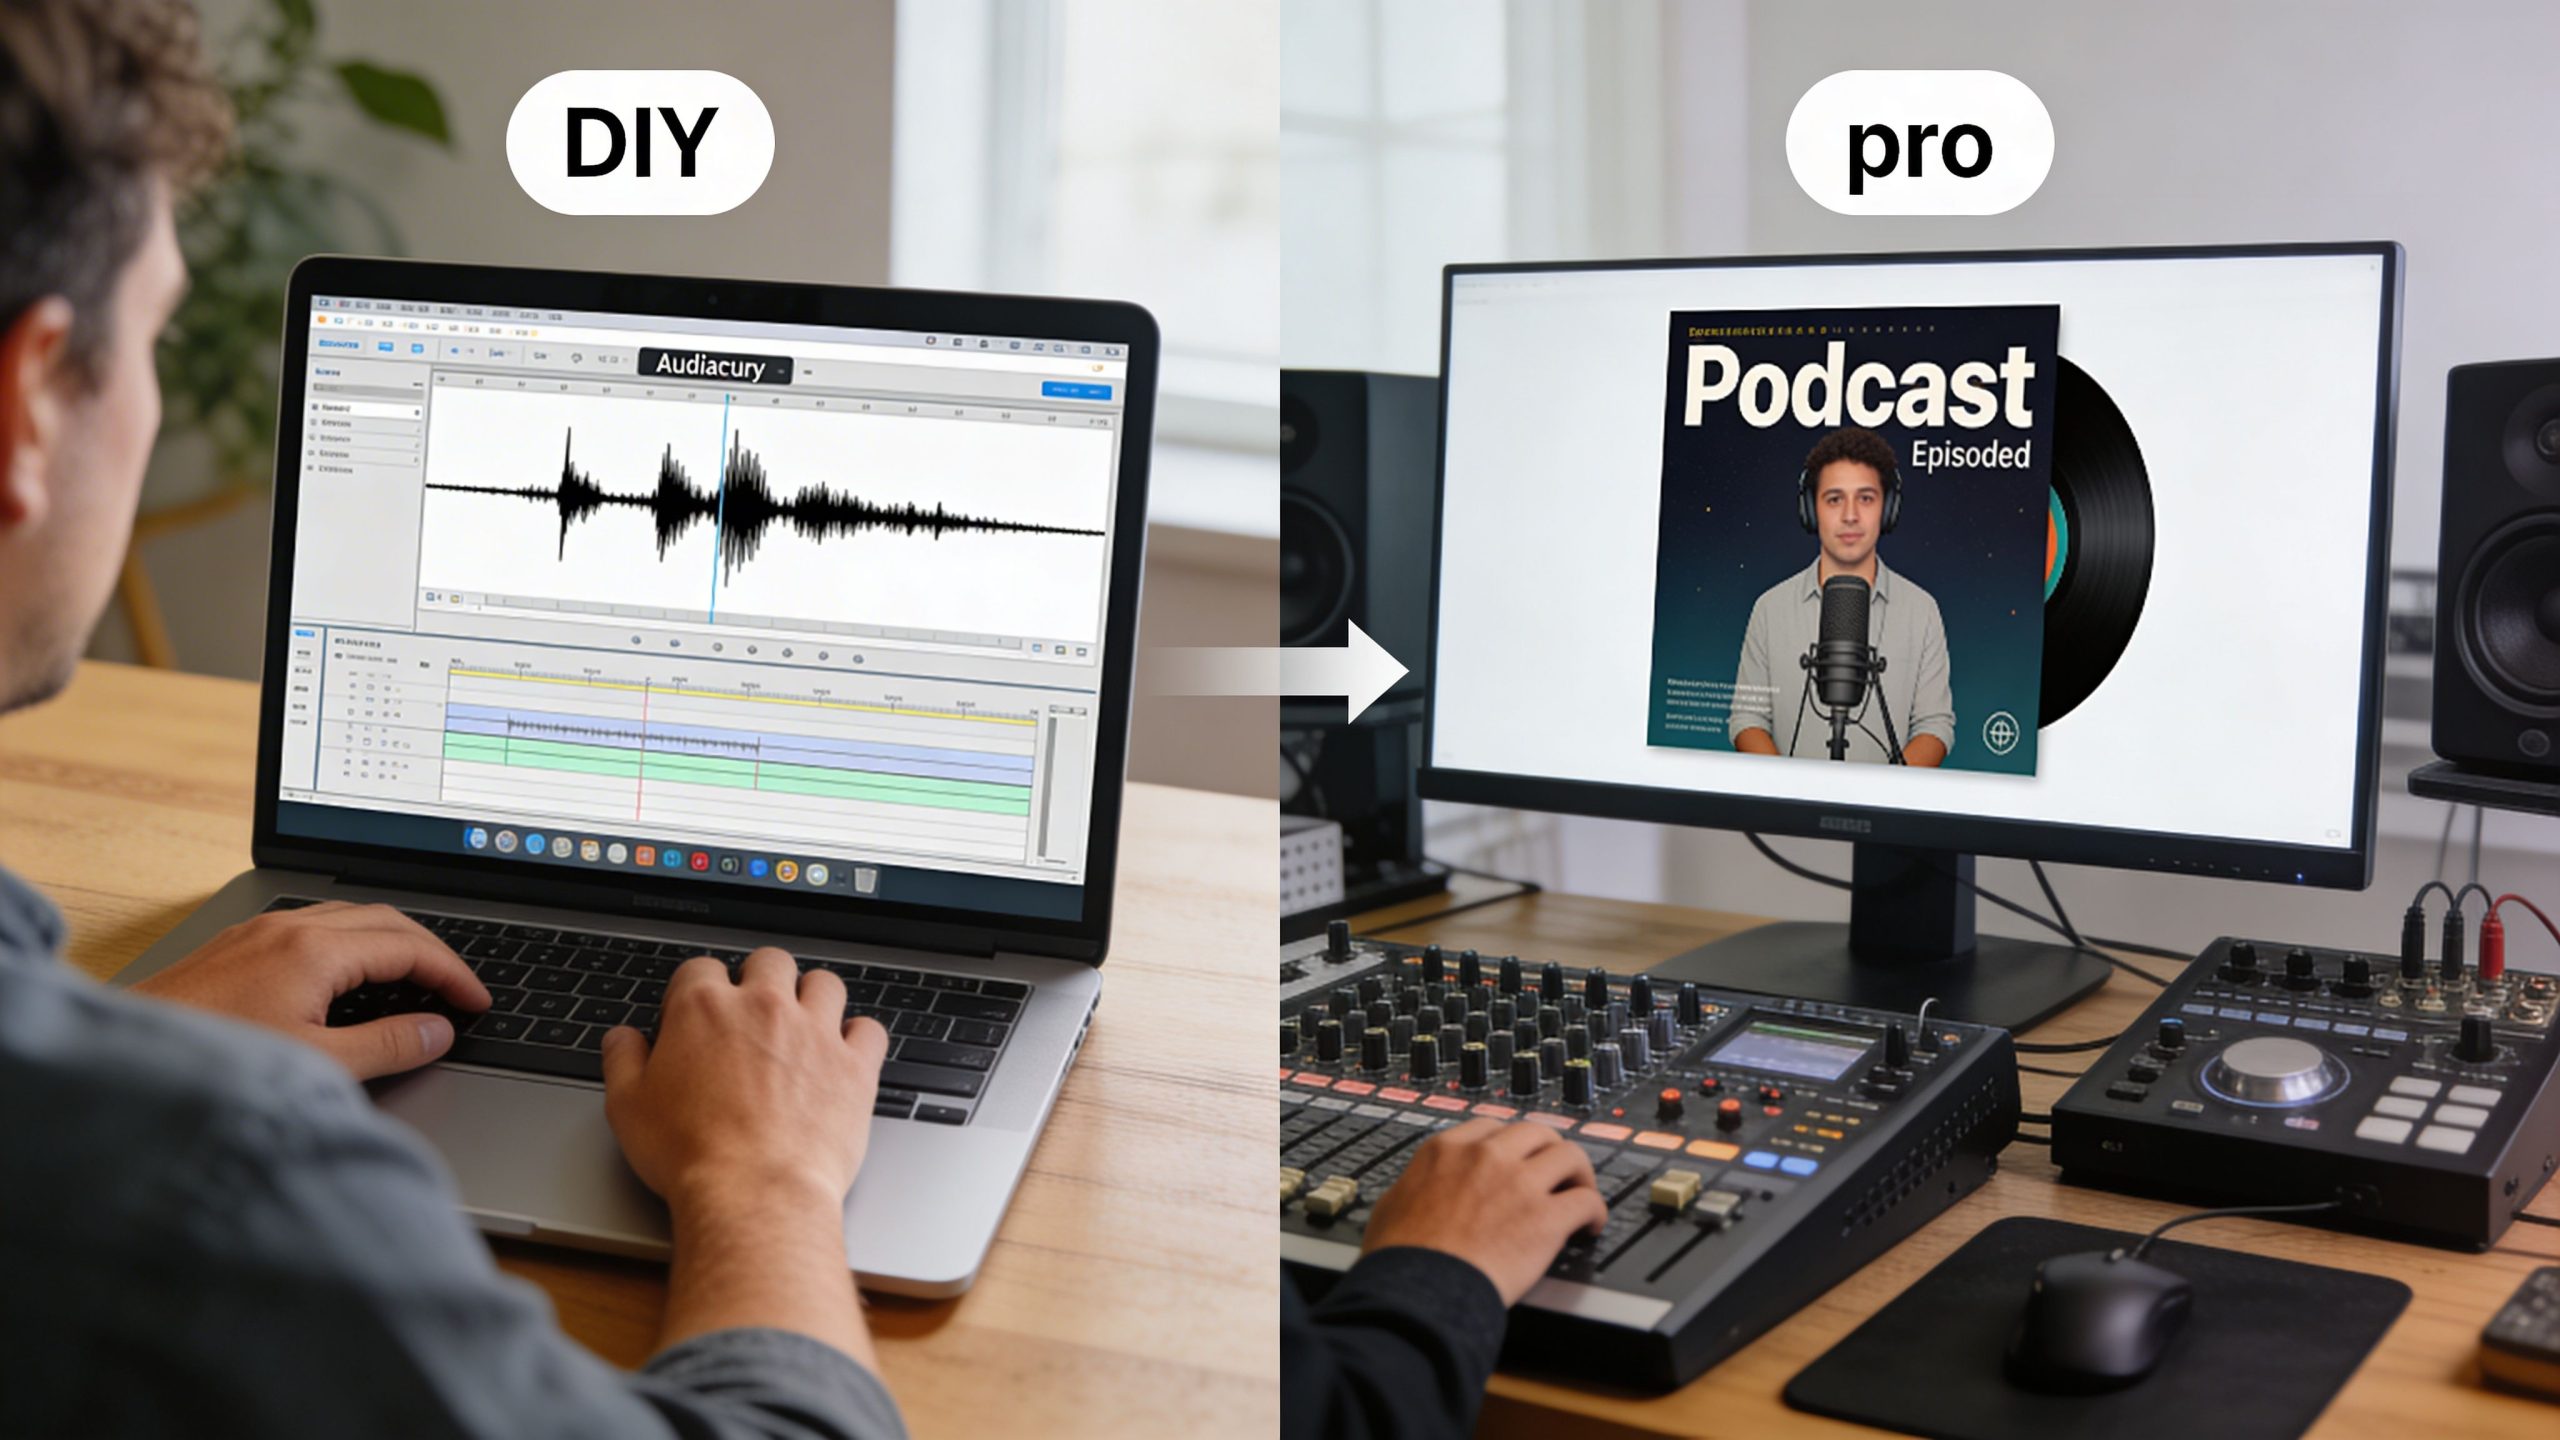
DIY editing has a real cost
You can edit your own show.
The better question is whether you should keep doing it once the show becomes part of your business, brand, or growth strategy.
Editing asks for a different skill set than hosting. So does mixing. So does video cutting. So does distribution. The more hats you wear, the more likely each part gets handled at a mediocre level.
That’s usually the point where creators start slipping on consistency. Episodes get delayed. Clip output slows down. Titles get rushed. Show notes become thin. Promotion happens late or not at all.
The moment your backlog starts shaping your publishing schedule, your production model needs to change.
If you want a clearer sense of where the handoff should happen, this guide to post-production best practices for podcast episodes is a smart next read.
Competition changes the standard
Podcasting is no longer a quiet niche.
By 2023, the space had grown to over 4 million active shows worldwide, and hosts are using analytics to target goals like a 10% monthly download increase, according to Podnews on podcast statistics. In a crowded field, professional production becomes a practical differentiator.
That doesn’t mean every show needs a massive team. It means sloppy execution gets exposed faster.
Here’s the honest split:
| If your show is mainly this | DIY may still work |
|---|---|
| Personal outlet | Yes |
| Early-stage experiment | Yes |
| Casual side project | Yes |
| Brand platform for a business | Usually not for long |
| Thought leadership engine | Usually not |
| Content source for clips and campaigns | Usually not |
The bigger the role your podcast plays in your business, the less sense it makes to treat production casually.
Know what work to keep and what to hand off
You don’t need to outsource everything.
Many strong hosts keep ownership of the creative core and hand off the technical and operational layers. That’s often the smartest setup.
Keep these if you’re good at them:
- Topic selection
- Interview direction
- Brand voice
- Final approval
Hand these off if they slow you down:
- Audio cleanup
- Video editing
- Motion graphics
- Distribution logistics
- Clip repurposing
- Growth reporting
That handoff is where a lot of stalled podcasts become sustainable.
Use services that match your stage
Different creators need different support levels.
If you love recording and hate everything after, a producer-led package is the sensible move. If your show is tied to audience growth, offers, partnerships, or personal brand expansion, you need more than editing. You need an operating system.
Based on the service brief, Content Days are $3000/day and include 20 edited reels or 60 pro photos. Podcast websites are $5000 plus hosting. For creators focused on audience growth, the Market, Manage & Produce My Podcast tier starts at $1500 per episode with a 20-episode growth commitment.
Those numbers matter because they force a useful question. Are you trying to publish episodes, or are you trying to build a media asset?
Those are different goals. They require different workflows.
Record with Confidence Publish with Authority
A strong podcast doesn’t start with hype. It starts with discipline.
When you learn how to record a podcast with a professional workflow, your show gets easier to trust. Your delivery feels cleaner. Your guests sound better. Your clips become more usable. Your brand stops sounding like it’s still figuring itself out.
That shift compounds. Better capture leads to easier editing. Easier editing leads to more consistent publishing. More consistent publishing gives your audience a reason to come back.
If you’re building a serious show, treat recording like part of your authority, not just a technical task. And once the foundation is in place, visibility matters too. If you’re thinking beyond production into discoverability, this podcast audio backlink website submission guide offers a practical look at distribution-minded promotion.
You don’t need to overcomplicate this. You need a repeatable process, a space that supports your voice, and the discipline to stop accepting “good enough” audio when your ideas deserve better.
If you’re ready to tighten your workflow and produce episodes in a more controlled environment, book a session or tour with Flexwork Podcast Studios. It’s a practical next step for creators who want cleaner recordings, stronger content output, and a more professional production rhythm.

