Live Streaming Studio Setup: A Practical 2026 Guide
 September 8, 202626 Minutes
You're halfway through a livestream when the chat starts repeating the same message: nobody can hear you. Your camera is hunting focus, the overhead light is flickering across your glasses, and the guest's connection is beginning to fall behind. You bought the camera, microphone, and software, but the room still behaves like an office.
That's the problem with a live streaming studio setup. Reliability comes from the room, signal path, and repeatable workflow, not from collecting impressive gear. Flexwork Studios approaches production from that foundation, with studio rentals, podcast production packages, Content Day sessions, and podcast websites for creators who want polished content without becoming full-time engineers. This guide gives you a room-first framework, practical acoustic and lighting fixes, equipment tiers, an OBS baseline, network safeguards, and a clear test for when a turnkey studio makes more financial sense than building alone.
Why Most Live Streaming Studio Setups Break Before They Start
A creator is midway through a product pitch to a large audience. The audio cuts in and out. Chat messages stack up with complaints that the presenter is impossible to understand. The camera hunts focus under a buzzing overhead LED, while a guest waits in silence because the return feed has drifted out of sync.
That collapse usually starts before the broadcast. Untreated reflections bounce around the room until a lavalier microphone captures too much reflected sound. A single Wi-Fi uplink struggles under a high-resolution stream. Overhead fluorescents fight a key light set to a different color temperature, forcing the camera to compensate from moment to moment.
The gear may be perfectly functional. The system isn't.
Live streaming has become a major media category, and one recent market report estimates the global market at $2.09 billion in 2025, with a projection of $2.58 billion in 2026, representing 23.1% year-over-year growth in that report's forecast. The Business Research Company's live streaming market report helps explain why creators now need rooms that support recurring production, multi-camera switching, clean audio, controlled lighting, and fast publishing rather than a webcam pointed at a desk.
The failure is usually operational
A successful broadcast has to survive the entire path from talent to audience:
- Room: Reflections, HVAC noise, street bleed, and mixed lighting affect the source before software can process it.
- Capture: Cameras, microphones, capture cards, and cables must deliver stable signals.
- Control: Someone or something must manage switching, graphics, monitoring, and recording.
- Network: The connection needs sustained upload capacity, not just a flattering speed-test peak.
- Recovery: A local recording, alternate connection, and labeled replacement cables give the operator options when something fails.
The audience doesn't care which component caused the problem. They experience one broken show.
Practical rule: Design for the failure you can recover from, not the specification you can advertise.
A strong live streaming studio setup starts with the room, validates the network, and then chooses gear around the program. The next decisions should cover acoustic control, lighting placement, a tiered equipment path, OBS settings, audio routing, and redundancy. If those pieces feel like too much to own and maintain, that's useful information. A turnkey studio can be cheaper than months of troubleshooting and inconsistent output.
The Room Is the Setup
A camera and ring light aren't a studio. They're two pieces of equipment sitting inside one.
The room determines how much work every other component must do. Ceiling height affects microphone placement. Parallel walls create flutter echo. HVAC systems introduce constant low-frequency noise. Hard floors reflect voices upward into microphones, while windows add changing daylight and street sound. A large untreated room often needs more correction than a smaller room designed around the speaker, camera, and lights.

Before you buy anything, make three decisions.
Decide what the room must produce
A solo talking-head stream has different requirements from a two-host podcast, product demonstration, or remote interview. A multi-host room needs clear microphone positions, sightlines, and enough space for independent camera angles. A demonstration space may need movement, overhead views, and a wider shot that still keeps the presenter well lit.
Write down the show format. Then place the talent, microphones, cameras, and lights before shopping. A layout where everything sits in one straight line often produces flat images and awkward audio. A triangular arrangement gives each camera a purpose and keeps the lighting more natural.
Find the worst acoustic offender
Stand in the room and clap once. Listen for a sharp slap, a long tail, a low hum, or sound entering from a hallway. Don't treat every acoustic issue as the same problem. Absorption can reduce reflections, but it won't make an HVAC compressor disappear.
A compact treated room usually outperforms a spacious warehouse for a talking-head broadcast. You'll need less compensation, shorter cable runs, tighter lighting control, and less gain on the microphones. The room also needs to support the way you work, including storage, cable access, guest seating, and a clear operator position.
For a deeper look at the physical planning behind a creator space, review Flexwork's professional video recording studio setup guidance. A useful outside reference is media coverage of CloudOrbis, which offers context for evaluating how professional teams present technical and business-focused content.
Treat the room before the upgrade
Acoustics aren't a cosmetic improvement to postpone. Every session recorded in a reflective room creates dialogue that is harder to clean, edit, and reuse. Plugins can reduce some room sound, but they can't reliably reconstruct a close, natural voice from a distant microphone in a difficult space.
Measure the problem, lock the layout, and make the room usable before chasing a more expensive camera. That choice improves every stream, recording, clip, and video podcast produced there.
Acoustics and Lighting in Small or Multi-Use Spaces
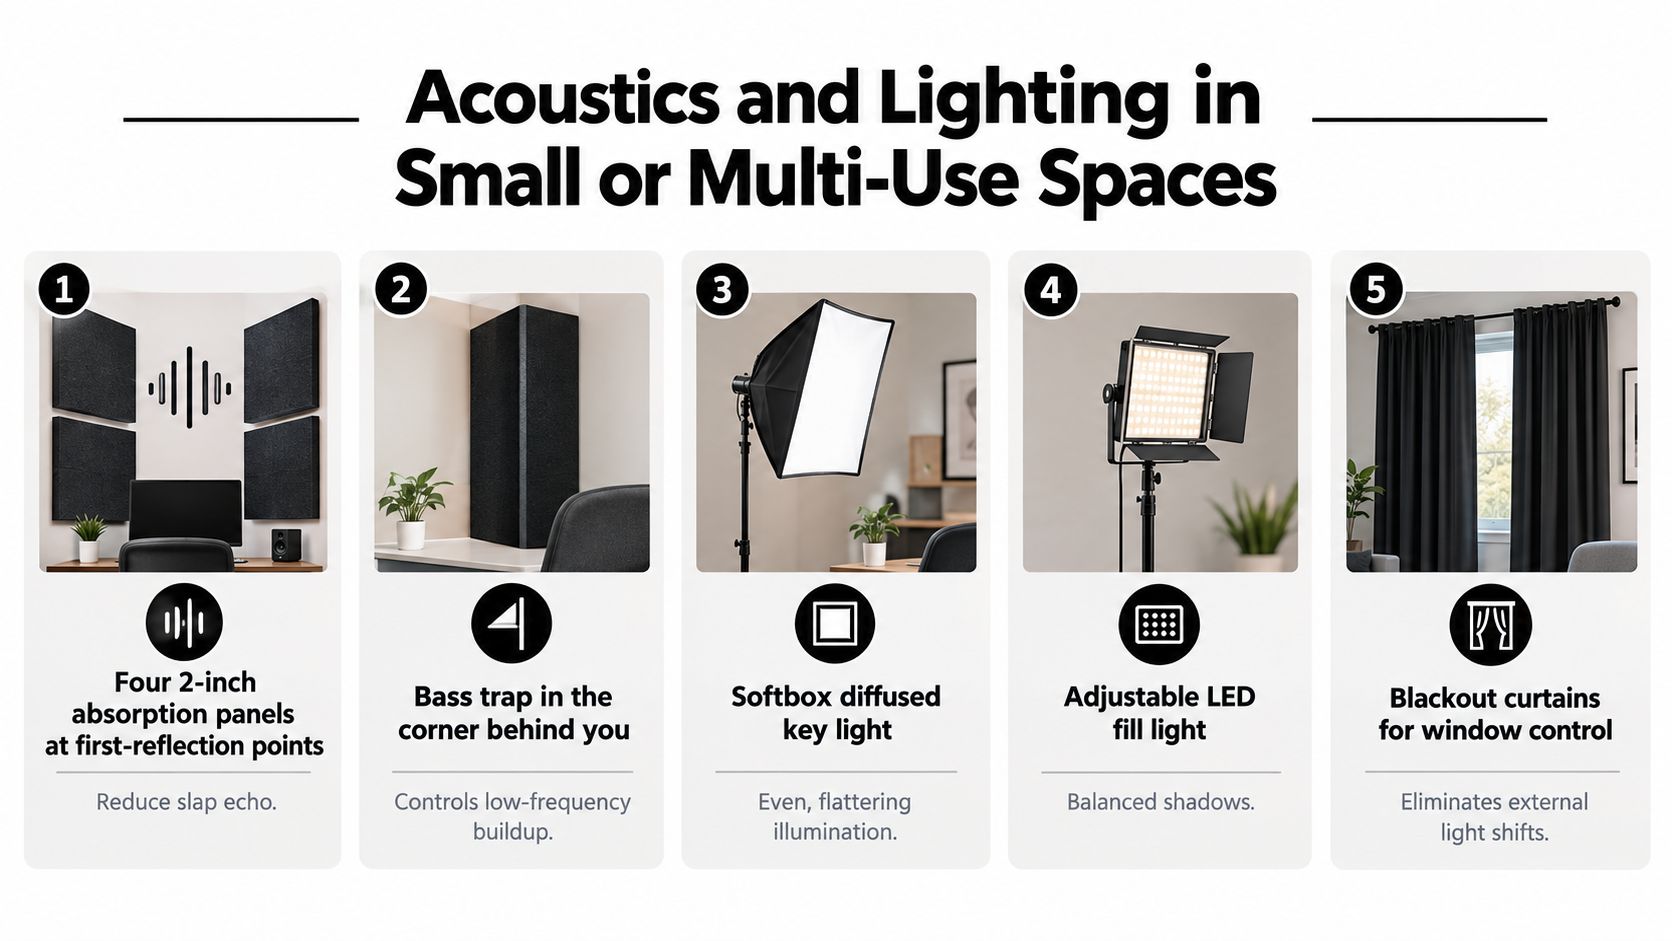
Small rooms can look excellent on camera, but they punish careless placement. The solution isn't covering every wall with cheap foam. Build enough broadband absorption to control reflections, then choose microphones and lights that suit the remaining limitations.
Start with four 2-inch absorption panels at the first-reflection points, a bass trap in the corner behind the talent, a thick rug under the speaking position, and sealed doors. Those changes can be completed as a practical weekend project in many rooms. The panels reduce reverberation, while the rug and door seals limit some of the high-frequency bounce and external leakage.
Match the microphone to the room
Broadband panels won't eliminate low-frequency rumble from an HVAC unit. Don't keep adding foam when the actual problem is mechanical noise. Move to a directional dynamic microphone such as the Shure SM7B, Electro-Voice RE20, or Rode PodMic, and position it close enough to the speaker to improve voice-to-room ratio.
That tradeoff matters in a multi-use room. A dynamic microphone may need more clean gain, but it generally gives you a safer starting point than a sensitive condenser placed across a reflective desk. If the host moves frequently, a lavalier can improve consistency, though clothing noise needs testing. A headset offers strong voice isolation, but some presenters find it restrictive on camera.
For room-specific treatment ideas, use Flexwork's guide to acoustic treatment for a home studio.
Build a lighting system you can repeat
Use two soft LED panels at roughly 45-degree angles from the presenter. Add a third light for separation or background detail when the set needs depth. Match every fixture to the same color temperature, either 5600K daylight or 3200K tungsten, rather than combining them.
Windows need control. Blackout curtains or consistent shades prevent the image from changing as clouds move or daylight fades. Turn off overhead fluorescents whenever possible, because they often create a competing color cast and unflattering top light.
Before every session, run a simple mask-off, glasses-off, lights-on test. Remove the presenter's glasses briefly, switch on the full lighting design, and check for glare, shadows, hot spots, and focus hunting. Then put the glasses back on and confirm the actual shot. This takes moments and prevents a distracting correction once the audience is watching.
Cameras, Mics, and Switchers Worth Choosing
Buy for the program, not the camera box.
A locked-off interview doesn't need the same system as a live product demonstration. For a fixed 1080p interview, one capable camera, a reliable 24–70 mm-equivalent lens, continuous power, clean HDMI output, and a sturdy tripod can outperform a multi-camera rig that rarely changes angles. Add a second camera when movement, demonstrations, or an independent close-up gives the viewer a clear reason to see another angle.
A third camera earns its place only when the show has enough visual information to justify matching, cabling, monitoring, and operator attention. 4K can help with reframing, but it can also add encoding and storage pressure. Don't select it because the menu offers it.
Choose audio before spectacle
A broadcast-style dynamic microphone on a boom is the dependable default for a room that isn't perfectly treated. For two speakers, use two independent microphones. One microphone placed between two people is usually too far from both, which forces more gain and brings the room into the mix.
Headphones should reveal hiss, clipping, echo, and uneven levels. Comfortable consumer headphones can flatter a mix and hide problems that your audience will hear immediately. For additional context on why image quality matters in professional communication, consult this overview of the benefits of business camera systems.
Let the production requirement decide the switcher
Software switching is economical and flexible. Hardware switching gives the operator tactile control, predictable inputs and outputs, and fewer computer-dependent failure points. A switcher becomes worthwhile when the show needs camera changes, graphics, playback, or a second host.
| Production Level | Camera Setup | Microphone Setup | Switching Approach | Best For |
|---|---|---|---|---|
| Focused solo | One locked camera | One dynamic microphone | Direct software scene changes | Talking-head streams |
| Interview | Two matched angles | One microphone per speaker | Software or compact hardware switcher | Podcasts and guest conversations |
| Demonstration | Wide, detail, and optional close-up | Dynamic microphone plus lavalier when movement requires it | Hardware or staffed software workflow | Products, teaching, and workshops |
| High-control production | Multiple matched cameras | Independent channels with monitored mix | Hardware switcher with dedicated operator | Branded broadcasts and recurring live shows |
Standardize on 1080p capture, lock exposure and white balance, and label every input. Spend first on the weakest link. A premium camera can't rescue distant audio, while clean audio can make a modest camera feel much more professional. Flexwork's video podcast equipment guide is a useful reference when you're comparing a complete workflow rather than isolated specifications.
Encoder and Software Settings That Hold the Stream Together
Encoding is a compromise among resolution, frame rate, motion, platform limits, and upload stability. Start conservatively, test privately, and increase quality only after the complete path proves stable.
A practical baseline is 1080p30 at 4,500 to 6,000 Kbps. For 1080p60, begin at 6,000 Kbps when the destination and connection can support it. Platform guidance summarized in an OBS setup guide for YouTube, Twitch, and Facebook places recommended YouTube bitrate around 10 Mbps for 1080p30, 12 Mbps for 1080p60, and 6 Mbps for 720p60. Those figures are not permission to skip testing. They're limits to reconcile with your actual encoder and connection.

Copy a controlled OBS baseline
Configure the canvas resolution and output resolution separately. Set the bitrate only after checking the destination's current rules, then use CBR where supported, a two-second keyframe interval, and 48 kHz audio, settings also recommended in the OBS guidance above.
Use a high-quality H.264 preset appropriate to the computer. Hardware encoding such as NVENC or Quick Sync can reduce CPU pressure, but test for dropped frames, color shifts, and audio sync before relying on it. Avoid an “ultrafast” preset during a live show unless CPU stability leaves no alternative. It reduces processing demand, but the quality and file-size tradeoff can be severe.
Separate the live profile from experiments
Create a reusable OBS profile and scene collection. Keep a clean baseline version so adding a new guest layout or animated graphic doesn't turn the next broadcast into an unplanned engineering session.
Use audio tracks deliberately:
- Program mix: A clean version for the published archive.
- Backup mix: A second version with music lowered for recovery.
- Isolated microphones: Separate sources for post-production when the system can support them.
Run a 15-minute private or unlisted test through the actual destination before each important show. Check the sample rate, microphone delay, capture-card load, NDI load, published bitrate, and local recording. Record a local backup at higher quality, but make sure storage performance can handle recording without competing with the encoder.
Flexwork's podcast recording software resource can help you compare software choices without confusing more features with a more dependable workflow.
Network Reliability and Audio Routing
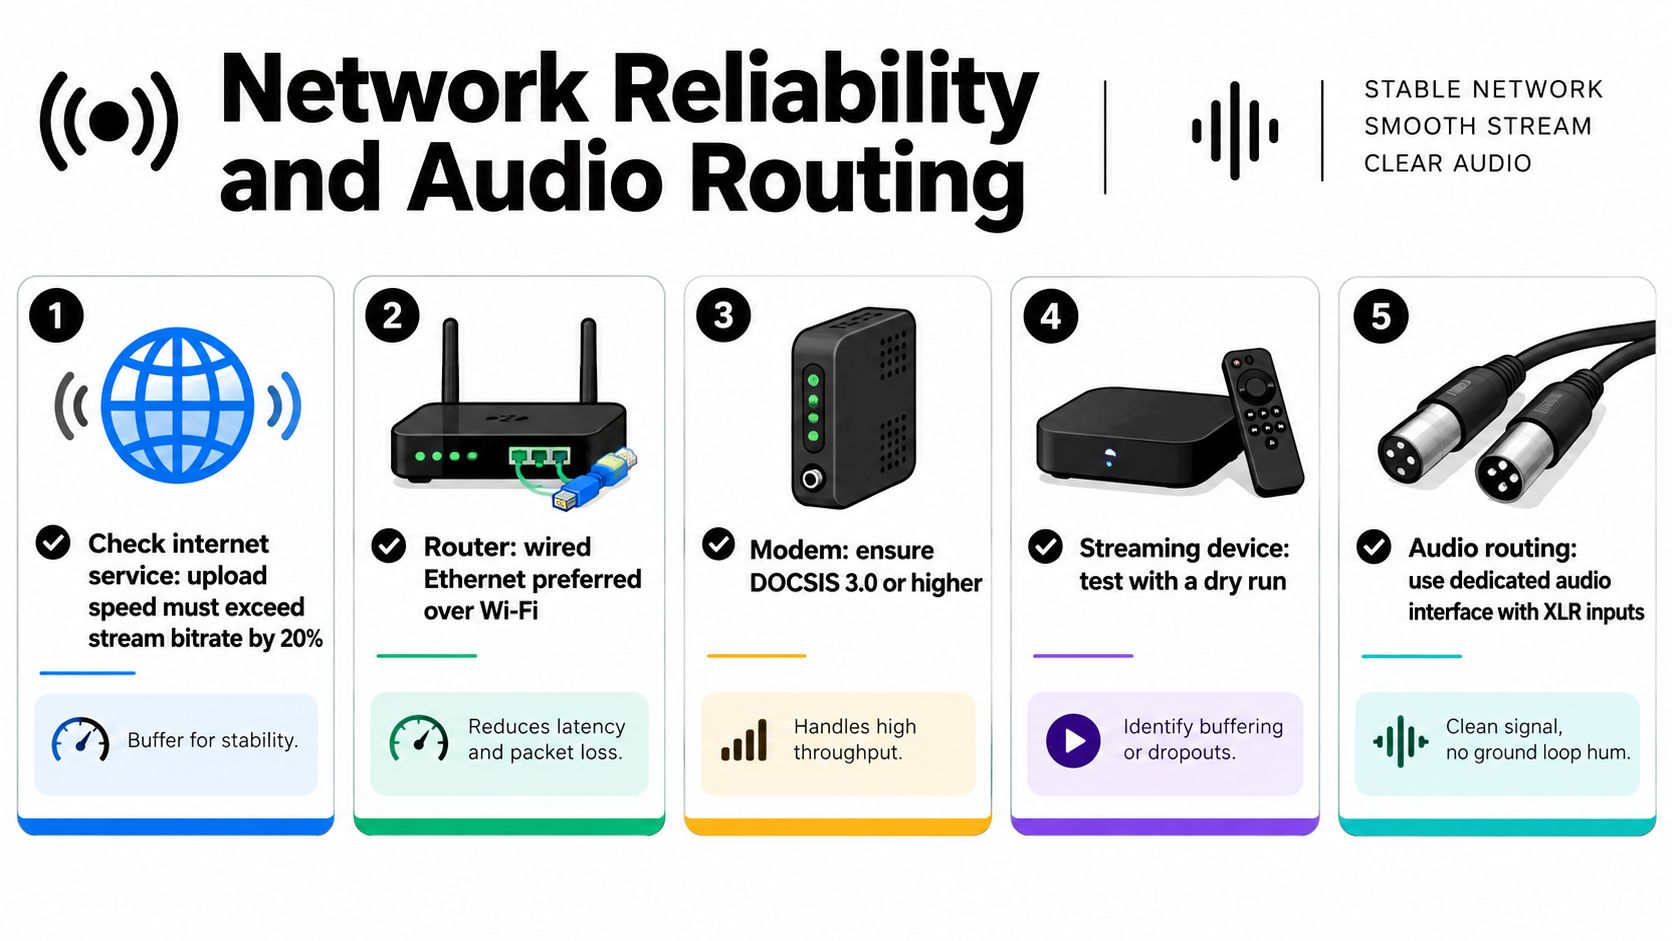
Upload speed is only one part of the failure surface. The stream travels through the internet service, modem, router, Ethernet or Wi-Fi link, streaming computer, encoder, and platform ingest. Any one of those stages can introduce packet loss, delay, buffering, or a complete interruption.
Use wired Ethernet as the default. Choose a business or low-contention broadband plan when the show affects clients, sales, or recurring audience expectations. Disable background backups, cloud sync, operating-system downloads, and other bandwidth-heavy tasks before going live. A short speed-test burst isn't enough. Run a sustained test and use a conservative stream bitrate that leaves headroom.
A published studio setup guide lists 5 Mbps upload and download as a minimum and recommends a second monitor when streaming from one computer. Wowza's live streaming equipment guide provides that baseline, but a minimum isn't a professional operating target.
Build audio routing on paper first
Choose one device to own the final mix. It might be a hardware switcher, digital mixer, audio interface, or software mixer. Document the order so nobody changes the signal path accidentally during a show.
Set consistent microphone gain at the input. Add a limiter to catch unexpected peaks, then route the program feed to headphones through an audio delay that matches the camera and processing path. Monitor return audio on a separate output where possible. Hearing a microphone in the room doesn't prove that it reaches the encoder.
The audience now expects live video to behave like mainstream media. A 2026 industry report said major live streaming platforms exceeded 29 billion hours watched in a single quarter, while YouTube Live accounted for 13.562 billion hours watched in that report. The Streamer Guide's Q1 2026 landscape report gives useful context for why unstable sound and visible production errors damage credibility.
Give the show an exit route
Prepare two failure paths. A bonded cellular connection or second internet service can protect the broadcast, while a local recording protects the content if the destination fails. A hotspot isn't a backup until you've tested its data plan, signal, power, and placement.
For a practical explanation of low-latency considerations, consult the SwiftNet Wifi streaming guide. Label every cable, keep certified replacements nearby, and place the power, modem, router, switcher, and encoder where the operator can reach them without stepping into the camera frame.
When a Turnkey Studio Beats Building Your Own
A self-built studio looks cheaper when you count only the first camera purchase. Count the entire operating burden instead: acoustic treatment, lighting control, stands, cables, capture hardware, encoder configuration, monitoring, backups, storage, maintenance, troubleshooting, and the hours lost before every session.
The break-even question isn't whether you can buy the equipment. It's whether your team can produce enough reliable content to recover the cost and still protect its time. A solo creator who streams occasionally may never reach that point. A marketing team producing recurring interviews, livestreams, clips, and podcast episodes may reach it sooner, but only if someone owns the system and can fix it under pressure.
Use a practical decision rule
Building in-house makes sense when:
- The room already works: You have controlled acoustics, stable lighting, secure equipment storage, and a layout that doesn't need rebuilding for every format.
- An operator is accountable: One person owns preflight checks, switching, audio routing, recording, and recovery.
- The schedule is frequent: The system gets used often enough to justify maintenance and training.
- The format is predictable: The show doesn't require frequent guest connections, complex switching, or rapid changes between podcast, livestream, and short-form production.
Outsource when the opposite is true. If every session starts with cable hunting, lighting adjustments, software updates, and a fresh network test, the setup isn't saving time. It's consuming production capacity.
Pay for infrastructure only when you need it
A turnkey room supplies the parts creators usually underestimate, including treated acoustics, controlled lighting, pre-wired cameras, dedicated connectivity, monitoring, and on-site help. Flexwork Podcast Studios offers studio rentals and production support for livestreams, podcasts, and video content, with live access supported by dedicated internet and engineer assistance for setup, troubleshooting, and monitoring.
Its in-house studios resource is relevant for teams deciding whether to build a permanent production environment or use a ready-to-run room. For creators who need more than a single broadcast, Flexwork's Content Days are $3000 per day and include 20 edited reels or 60 professional photos. Podcast websites are $5000 plus hosting, while the Market & Manage tier starts at $1500 per episode with a 20-episode growth commitment.
Video podcast demand also supports treating the studio as a content engine, not a one-off recording room. Edison Research reports that 51% of the U.S. population aged 12 and older has ever watched a video podcast, 37% watched one in the last month, and 26% watched one in the last week. Edison Research's Podcast Consumer 2025 findings show why one well-produced session can serve a livestream, full episode, clips, and promotional assets.
Audio and video audiences are blending further. Edison's 2026 findings say video podcast consumption overtook audio-only consumption for the first time in Q3 2025, with 82% of weekly podcast consumers watching video compared with 78% listening to audio only. The cited Edison findings reinforce the commercial logic of designing one production day for multiple formats, while the podcast mix still needs loudness discipline. Podcast audio has largely standardized around -16 LUFS, compared with -24 LUFS commonly used by U.S. broadcast radio and television and -23 LUFS elsewhere, as documented in Edison's podcast research PDF.
The right setup is the one you can run repeatedly without sacrificing your voice, schedule, or audience's trust. If you want the room, crew, switching, dedicated connectivity, and post-production handled together, book a session with Flexwork Podcast Studios in Springfield, NJ. Their studio rentals, production packages, Content Day sessions, and podcast website services let you focus on the conversation while the infrastructure supports the broadcast.