
Acoustic Treatment for Recording Studio: Your 2026 Guide
 July 22, 202617 Minutes
You can spend days polishing a script, upgrading your microphone, and dialing in the camera, then hit record and still end up with audio that feels cheap. That mismatch is exactly what makes creators second-guess themselves, because the content is strong but the room gives away the truth. Acoustic treatment for recording studio spaces isn't about making a room look technical, it's about making your voice sound intentional, trustworthy, and ready for a premium audience. For creators booking Flexwork Studios, that difference is the line between content that merely exists and content that supports a brand.
The Unspoken Reason Your Content Isn't Landing
A podcast host can have sharp takes, great pacing, and a clean visual setup, yet listeners still notice the room before they notice the message. That happens when the environment is doing too much talking. A hard, reflective room adds a layer of uncertainty to every word, and uncertainty is poison for a polished brand.
The most common version of this problem is simple. The setup looks professional on camera, but the sound carries a faint hollow tone, a boxy bounce, or a distracting room tail. The audience may not name the issue, but they feel it immediately, and that feeling changes how they judge the creator.
Practical rule: if the room sounds like a room, the room is part of the content.
That's why the cleanest podcast rooms feel calm before anyone even speaks. A treated room removes distractions, so the voice feels closer, clearer, and more expensive. If you want a quick primer on the difference between blocking noise and controlling reflections, Flexwork's own how to soundproof a room overview is a useful companion read. For broader clarity fundamentals, LesFM's audio clarity guide is also a practical reference.
Why Your Room's Sound Sabotages Your Brand
Reverberation changes how listeners judge you
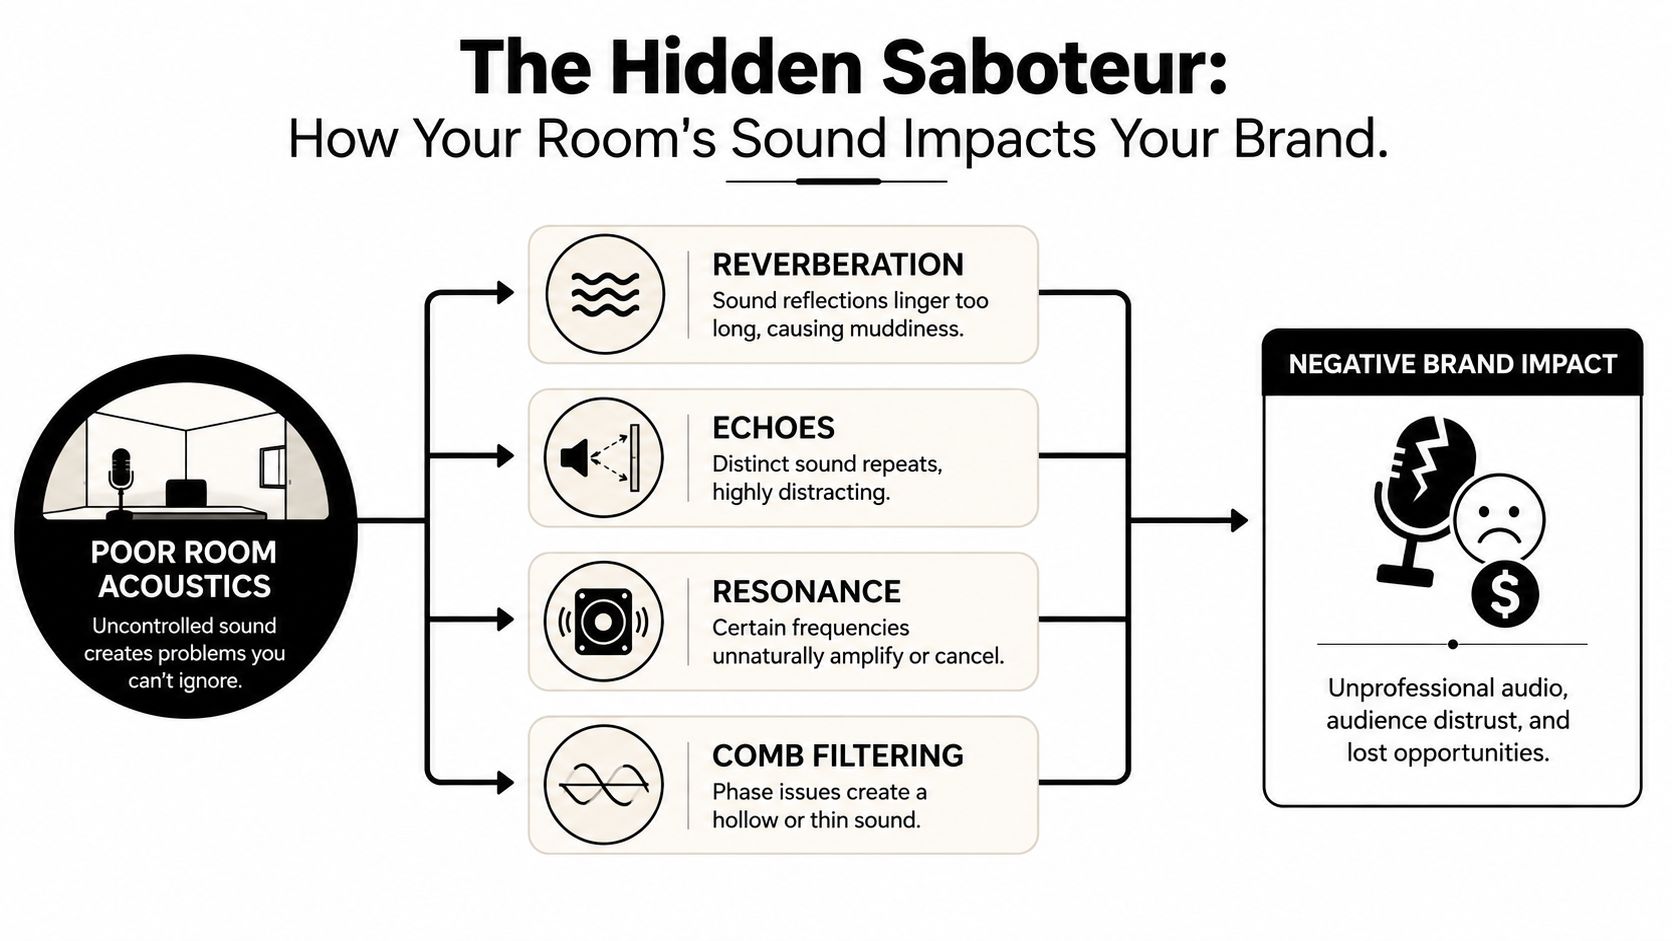
Reverberation is the lingering sound that hangs after you speak. In professional control rooms, the target is commonly 0.2 to 0.4 seconds RT60, with early reflections minimized within the first 25 ms so mix decisions translate more reliably across playback systems, and that same metric matters for spoken-word content because too much decay blurs speech and low-end accuracy. A room with excessive reverberation doesn't just sound airy, it sounds less disciplined. According to the acoustic-treatment guide at Sonido en Red, small studios often need around 30 to 40% wall coverage to get usable control, because the goal is predictable sound rather than silence.
A room that's too live makes even a strong host sound less certain. The words are still there, but the room adds friction, and listeners work harder to process the message.
Bass buildup is the part most creators miss
Low frequencies collect in corners, and untreated rooms let that energy pile up. That's why serious acoustic treatment starts with bass control, not decorative foam on random walls. When low-end buildup is left alone, voices can sound muddy, boomy, or uneven, especially in compact rooms where resonances are magnified by short dimensions.
The brand issue becomes apparent. A muddy voice doesn't just sound bad, it sounds unfocused. If your show sells expertise, coaching, consulting, or authority, any sense of blur works against the promise.
Flutter echo makes a room feel unfinished
Flutter echo is the rapid back-and-forth reflection that happens between hard, parallel surfaces. It can make claps, syllables, and sharp consonants feel metallic or thin. The listener may not know what flutter echo is, but they know the room feels unfinished.
A helpful way to think about the problem is this. Reverberation makes the message feel distant, bass buildup makes it feel cloudy, and flutter echo makes it feel amateur. Together, they create the exact opposite of the premium experience creators want to project.
Choosing Your Acoustic Treatment Arsenal

A creator can spend hours refining the script, the delivery, and the edit, then lose the whole advantage to a room that colors the voice. The fix is not random gear. It is the right mix of treatment, placed with intent, so the room supports the message instead of competing with it.
Bass traps do the heavy lifting
Bass traps are the first tool that matters in a serious room. Guidance from Second Skin Audio recommends placing them in all four corners, because corners collect the most low-frequency energy. That is the highest-impact starting point, and it is why thin foam alone usually disappoints.
Thickness matters. General absorbers are often 3 to 4 inches thick, while stronger control below 200 Hz can call for 8 inches or more in the right placement. Another acoustic guide notes that low-frequency absorbers often need substantial depth to work effectively, and porous absorption is practical up to around 10 cm thick, which is why padding a wall with light foam usually will not solve a bass problem.
Practical rule: if the bass feels unstable, start in the corners before you touch anything else.
Broadband absorbers clean up the voice
Absorption panels handle the reflections that make speech sound smeared. They belong at first reflection points, on ceilings, and on rear wall zones where early bounces are strongest. One planning rule from eHomeRecordingStudio suggests a well-treated room often aims for roughly 40% wall and ceiling surface coverage, with thick broadband absorption and an air gap for stronger low-frequency performance.
For podcasters and creators, that means the room should support clarity without sounding completely lifeless. Overdo absorption and the voice can feel flat. Underdo it and the room stays loud enough to be part of the show.
A practical layout for a rented space or a purpose-built set usually starts with the room problems that matter most, then adds visual polish later. If you want examples of how a finished podcast room can be arranged before you buy panels, podcast studio design ideas can help you see how treatment, furniture, and workflow fit together.
Diffusers add space without adding chaos
Diffusers scatter sound instead of killing it. They are most useful once the room already has decent low-end control and the first reflections are handled. In the wrong room, diffusion just preserves confusion. In the right room, it keeps the space open while preventing harsh slapback.
For a creator building a brand, that balance matters. You want a voice that feels close and clean, but not so dead that it sounds disconnected from the person speaking. That is why acoustic treatment for recording studio design is always a sequence, not a shopping list.
If you are comparing room materials and trying to understand why some surfaces work while others do not, understanding STC and NRC ratings can help you separate marketing from actual performance.
Strategic Placement for Maximum Audio Clarity

A room does not improve just because you add more panels. The fastest gains come from treating the right zones in the right order, with bass control handled before you start chasing finer details. In small studios, low-frequency buildup usually gathers in corners first, so that is where the work starts.
A practical workflow starts with baseline tests, then moves through the most disruptive reflection points, then checks the room again to confirm the change. For a clear, measurement-first overview of that process, Home Studio Recordings lays out the same sequence, measuring first, treating problem areas, then verifying the result. That keeps treatment decisions tied to what the room is doing.
Start with the corners
Put bass traps in the vertical corners first. If the room has enough height, the floor-to-ceiling corners usually need attention before anything else, because they collect the deepest low-frequency buildup. In compact rooms, the low end often piles up there and turns speech into a thicker, less controlled sound.
Treating only the walls can leave that problem in place. The room may look finished, while the monitoring still misleads you. That is the mistake many DIY builds make, especially when the goal is a polished voice for clients, sponsors, or an audience that expects a premium sound.
Find first reflection points with the mirror trick
Once the corners are under control, move to the first reflection points. Sit where you will record or monitor, then have someone slide a mirror along the side wall. Wherever you can see the speaker or the source in the mirror, that spot needs absorption.
The ceiling matters too. A ceiling cloud above the listening or recording position can reduce the strongest overhead bounce before it folds back into the mic. In practice, that usually gives you cleaner speech without making the room feel overly damped or boxed in.
Recheck the room after each move
A step-by-step tuning process works better than a one-time install. Reposition the speakers in small increments, remeasure after each change, and listen for the point where the image firms up and the low end stops smearing the voice. That kind of adjustment is slow, but it keeps you from locking in a setup that only looks symmetric.
The goal is controlled, repeatable sound, not a room that just photographs well. One room-acoustics guide notes that with enough bass trapping and early-reflection control, a short decay time across the frequency range is the target, not random absorption everywhere. That is the standard that keeps a podcast or creator session sounding intentional.
For creators who want a practical model of that kind of controlled recording environment, Flexwork's home podcasting studio setup shows how intentional placement supports consistency from session to session.
The DIY Dilemma Versus The Professional Shortcut
A DIY treatment plan sounds straightforward until you start doing the work. You need to measure the room, identify the frequencies misbehaving, choose the right materials, install them cleanly, and test again. That is all manageable, but it takes time, and a poor purchase can leave you with panels that tame flutter echo while the low end still clouds the voice.
Measurement is what separates a serious room from a decorative one. A proper workflow uses tools like REW and a UMIK-1 mic for baseline tests, then treats the corners and the main reflection points, then measures again to confirm what changed. The reason is simple, panels added without measurement can leave problem frequencies unresolved.
Busy creators have a business decision to make.
Do you spend hours learning acoustics, or do you record in a room that is already sorted?
A turnkey studio often makes more sense. Flexwork Studios offers Hourly Rentals for fast, focused sessions, and its Content Day package is priced at $3000/day and includes 20 edited reels or 60 pro photos. For creators who need a clean environment without taking on a build-out project, that shifts the workload from experimenting to publishing. The case for going pro is laid out clearly in Flexwork's studio vs DIY podcasting comparison, which is worth reading before you buy another panel.
Flexwork Podcast Studios is one option for that kind of workflow. It provides acoustically treated recording spaces that support podcast and video production without asking the client to become an acoustics technician. That matters when your brand has to sound as polished as it looks.
Your Launch-Ready Studio Checklist and Next Steps
A strong recording space doesn't need to be complicated, but it does need to be deliberate. The checklist is straightforward.
- Treat the corners first. Bass traps belong in the corners because that's where low-frequency buildup concentrates.
- Control first reflections next. Side walls and the ceiling need absorption where sound bounces directly back to the mic.
- Keep flutter echo in check. If sharp reflections are still bouncing between hard surfaces, the room will sound unfinished.
- Use thickness that matches the problem. Thin decorative foam won't solve serious low-end issues.
- Measure before and after. If the room changes, verify what improved.
The premium move isn't always building more. Sometimes it's choosing a room that already does the hard part well. That's why a rented studio often makes more sense than a complex DIY project for creators who need consistent output, clean delivery, and a brand that sounds as polished as it looks.
If your next podcast, interview, or Content Day needs to sound right the first time, review the Flexwork studio rental page and compare it with the production packages that fit your workflow. Then book the environment that lets you spend less time fighting the room and more time making the content.
A CTA for Flexwork Podcast Studios.