Elevate Your Podcast: How to Create Motion Graphics
In a crowded content landscape, compelling audio is only half the battle. To truly capture an audience's attention on visual platforms like YouTube and Instagram, your content needs to look as good as it sounds. This is where motion graphics come in—transforming static designs into dynamic, animated assets that elevate your brand. For upwardly mobile creatives and entrepreneurs, learning how to create motion graphics isn't just a technical skill; it's a strategic move to build a premium media presence. At Flexwork Studios, we specialize in closing the gap between DIY production and broadcast-quality visuals, ensuring your message lands with the impact it deserves. This guide will walk you through the fundamentals and show you how to achieve a polished, professional look without the creative burnout.
Why Your Podcast Needs Motion Graphics
You’ve poured countless hours into creating crisp, compelling audio, only to see it fall flat when shared on visual-first platforms. It’s a common frustration for podcasters: your incredible content gets lost in a sea of static images and audiograms that fail to engage. This visual disconnect undermines your authority and limits your reach. The solution isn't just adding an image; it's creating a dynamic visual experience that commands attention. Motion graphics are the key to turning your audio into a premium asset that stops the scroll and reinforces your brand's quality.
High-quality motion design makes your podcast look as professional as it sounds. From a slick animated intro that builds brand recognition to dynamic social clips that highlight key moments, motion separates the hobbyist from the industry leader. It's a powerful tool for building authority and captivating your audience.
The Strategic Value of Motion in Your Content
Think of motion graphics as the visual punctuation in your brand’s story. They guide the viewer’s eye, emphasize your most important points, and wrap your content in a layer of professional polish that static images simply cannot match. In a world where attention is the most valuable currency, motion graphics help you earn it—and keep it.
Here’s the strategic advantage they provide:
- Increased Viewer Retention: Dynamic visuals are inherently more engaging than a static slide. Well-executed motion keeps viewers locked in, reducing drop-off rates and increasing watch time.
- Simplified Complex Ideas: Have a complex topic? Animation can break it down into simple, digestible visuals, making it perfect for explaining a difficult concept or demonstrating a process.
- Enhanced Brand Recognition: A unique logo animation or custom lower-third graphic becomes your visual signature. This consistent flair reinforces your brand identity with every view, building familiarity and trust.
Ultimately, integrating motion graphics into your workflow is a direct investment in your brand's perceived value. It signals to your audience that you are a high-quality, authoritative voice in your space. Ready to see how far one episode can go? Learn how to repurpose a single podcast episode into 10 pieces of content with motion graphics leading the charge.
Choosing Your Motion Graphics Software
Before you can create compelling animations, you need the right tools. Selecting your software is a critical decision that will define your creative capabilities and workflow. The goal isn't to find the single "best" program but to find the one that aligns with your skills, goals, and your podcast's aesthetic. The right choice unlocks creative potential; the wrong one leads to frustration and wasted time. For anyone serious about learning how to create motion graphics, the choice often comes down to a few industry-leading platforms.
The Professional Powerhouses
When you envision complex, layered, and fluid animations, you are likely thinking of Adobe After Effects. It is the undisputed industry standard for a reason. This is the software for building sophisticated title sequences, detailed character animations, and slick visual effects from the ground up. Its deep toolkit for keyframing, compositing, and effects makes it the driving force behind the polished graphics you see in professional media.
Its sibling, Adobe Premiere Pro, is primarily a video editor, but its motion capabilities should not be overlooked. It is highly efficient for handling essential motion tasks, like animated text, clean lower-thirds, or simple logo reveals, directly within your editing timeline. This makes it an excellent choice for podcasters who need a touch of motion without the steep learning curve of a dedicated animation program. For a deeper look at other platforms, explore our guide on the best video editing software.
Accessible and Emerging Tools
The motion graphics landscape extends beyond Adobe. Blender has emerged as a powerful—and completely free—open-source alternative. While renowned for 3D modeling, its 2D motion graphics capabilities are impressive and continually improving. For creators on a budget or those interested in exploring 3D visuals, Blender provides professional-grade tools without a subscription fee.
For rapid ideation and social content, an AI animation generator can be a useful tool. These platforms are evolving quickly, offering new ways to produce simple animations for social media clips or to brainstorm visual concepts.
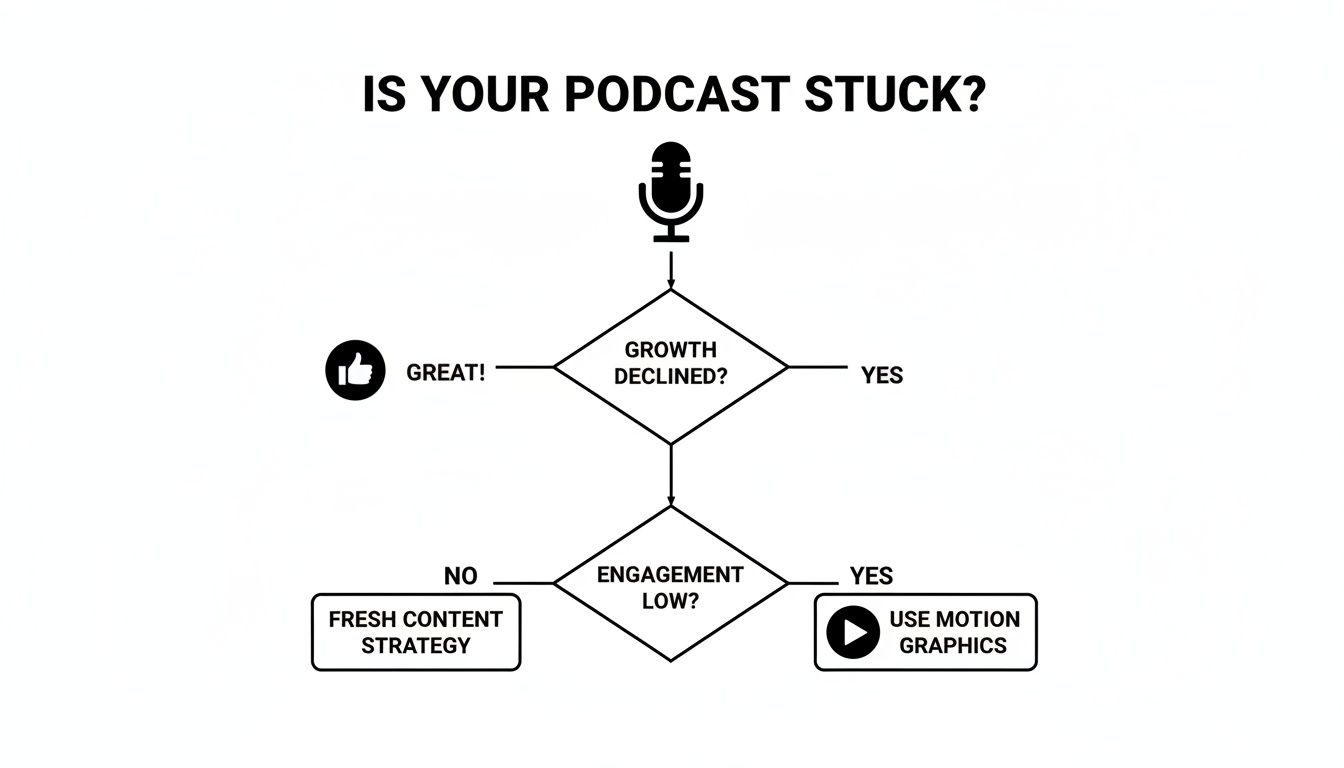
As the flowchart suggests, when audience growth begins to plateau, elevating your visual strategy with motion graphics is often the key to breaking through to the next level.
The Hidden Costs: Hardware and Expertise
Software is only one part of the equation. Professional motion graphics work requires significant computing power—high-performance processors, advanced graphics cards, and substantial RAM are necessary to render projects efficiently. This hardware investment often comes as a surprise to aspiring creators.
This is precisely why many ambitious podcasters and brands choose to partner with a professional studio. Creating high-quality motion design requires a blend of design, illustration, and animation skills, in addition to the right hardware. At Flexwork Studios, we have already made the investment in top-tier technology and talent. Our production packages, like the “Be My Podcast Producer” tier, provide access to our entire high-end workflow, allowing you to bypass the steep learning curve and hardware expenses and go straight to creating premium content.
Mastering the Principles of Great Animation
Powerful software is essential, but it doesn't guarantee professional results. The magic of compelling motion design lies in mastering the fundamental principles of animation. This is where we move beyond tools and into the techniques that separate amateurish movement from the fluid, intentional visuals seen in top-tier content. These are the skills that allow you to create motion graphics that don't just move, but communicate with purpose. Understanding these core concepts is an investment in your ability to produce high-value content that resonates with your audience.
Keyframes: The Foundation of Animation
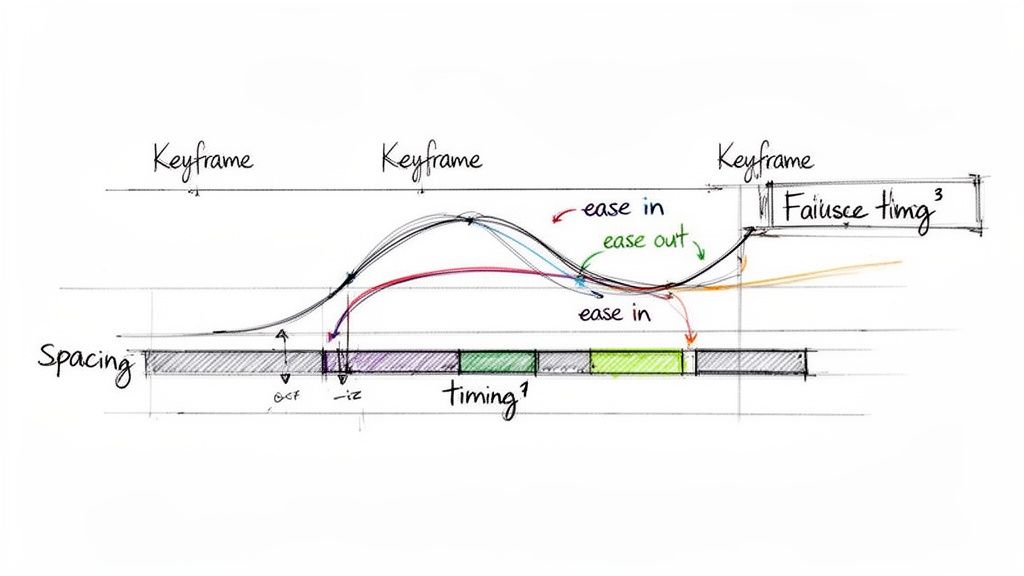
Everything in digital animation begins with the keyframe. A keyframe is a marker on your timeline that defines an object’s properties—such as its position, scale, or opacity—at a specific moment in time. You set a keyframe for the starting point (e.g., a logo is off-screen) and another for the end point (e.g., the logo is centered), and the software generates the frames in between. Think of it as providing a start and end destination; the software calculates the path. Mastering keyframes is the first step toward creating deliberate, controlled animation.
Rhythm and Flow: Timing and Spacing
Once you understand keyframes, the next step is developing a feel for timing and spacing. These principles work together to give your animations personality and realism.
- Timing: This refers to the duration of an action, measured in frames or seconds. Fast timing creates a sense of energy and urgency, while slow timing can feel more deliberate or dramatic.
- Spacing: This describes how frames are arranged between keyframes. Closely spaced frames result in slow movement, while frames spaced far apart create fast movement. An object that is accelerating will have frames that start close together and become progressively farther apart.
Easing: The Secret to Natural Motion
Animations that feel robotic or jarring often lack easing. In the real world, objects don't start and stop moving instantly; they accelerate and decelerate. Easing mimics this natural physics, transforming mechanical movement into something smooth and believable.
- Ease In: The object starts slowly and gradually accelerates to full speed. This is ideal for an element making a dynamic entrance.
- Ease Out: The object starts quickly and then gradually slows to a smooth stop. This is perfect for an element settling into its final position.
Applying easing to your keyframes is a simple adjustment that dramatically improves the quality of your work. It adds a sense of weight and momentum, instantly making your animations feel more professional. For a practical example, see this Elementor motion effects tutorial.
These principles are more than just technical settings; they are storytelling tools. The way an object moves can convey emotion, emphasize a point, or direct your audience’s attention. To learn more, explore our guide on the art of storytelling to create compelling content.
Your First Project: Building an Animated Lower Third
Theory is important, but practical application is where learning happens. Let’s build one of the most essential assets for any video creator: a clean, professional lower third. This project will apply the concepts of keyframes, easing, and timing in Adobe After Effects. By the end, you will have a tangible graphic you can use in your content and a clearer understanding of the precision required for high-quality motion design.
Set Up Your Workspace for Success
A well-organized project is the foundation of an efficient workflow. Before you begin animating, proper setup is crucial.
First, open After Effects and create a new composition. Use standard high-definition settings: 1920×1080 pixels at 29.97 frames per second. Set the duration to 10 seconds to provide ample time for your animation to enter, display, and exit.
Next, organize your Project panel. Create folders (bins) to keep your assets tidy:
- Comps: For your main composition and any nested compositions (pre-comps).
- Assets: For imported files like logos and brand style guides.
- Renders: A dedicated location for your final exported video files.
This simple organizational habit is a hallmark of professional workflows and will save you significant time later.
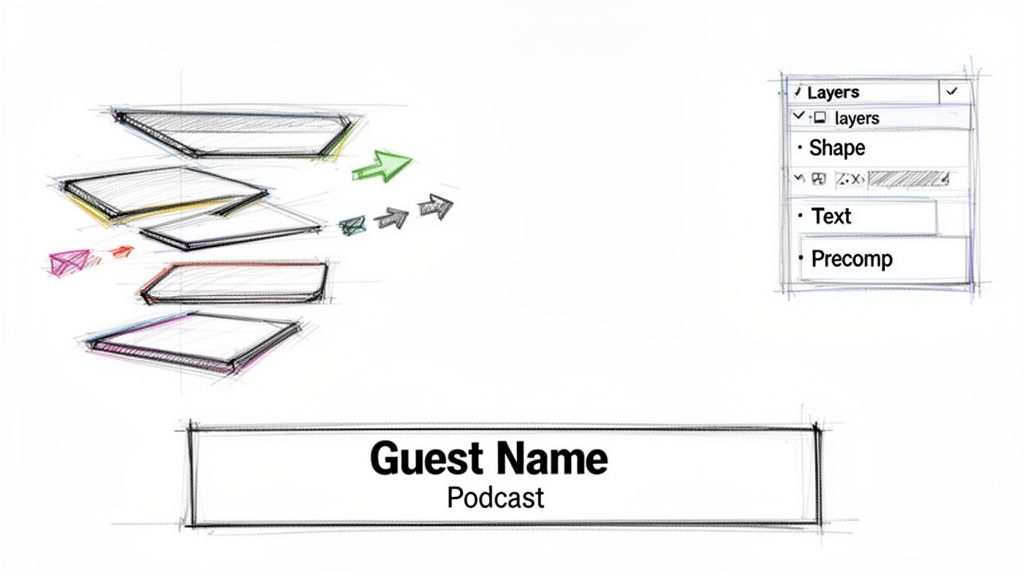
Build and Animate the Core Elements
With a clean workspace, it’s time to build the graphic. We will use shape layers, which are vector-based and can be scaled without losing quality.
Using the Rectangle Tool, draw a horizontal bar across the bottom third of the screen. This will serve as the background for the text. In the shape layer's properties, set the fill to your primary brand color and remove the stroke.
Now, let's animate it. Select the shape layer and press the "P" key to reveal its Position property.
- Move the playhead to the 1-second mark and click the stopwatch icon next to Position. This sets the first keyframe, marking the shape's final position.
- Move the playhead back to the beginning (0 seconds).
- Drag the shape completely off-screen. After Effects will automatically create a second keyframe.
Press the spacebar to preview the animation. The movement is linear and stiff. To fix this, select both keyframes, right-click, and choose Keyframe Assistant > Easy Ease Out. Now, the shape will start fast and smoothly glide to a stop, giving it a sense of weight and intention.
Add and Refine Text Animation
Next, add the text. Using the Type Tool, create a text layer for the name and another, smaller layer for the title.
To create a more sophisticated reveal, we will use a mask instead of a simple slide-on animation.
- Select the name's text layer.
- With the Rectangle Tool, draw a mask that completely covers the text.
- Animate the mask's path. Move the playhead to a point slightly after your background shape has settled, and set a keyframe for the mask path.
- Move the playhead back a few frames and adjust the mask so it is completely to one side of the text, hiding it.
Apply an Easy Ease Out to these keyframes as well. The text will now appear as if it is being unveiled in place—a polished and professional effect.
Finalize with Pre-Composing and Rendering
To keep your main timeline clean, bundle these layers together by pre-composing. Select all layers (the shape and two text layers), right-click, and choose "Pre-compose." Name it "Lower Third Animation." This nests all the elements into a single, manageable clip. You can learn more about creating a cohesive visual package in our guide to how you can build your podcast brand with custom studio assets.
Finally, render your animation. Add the pre-comp to the Render Queue. To ensure the background is transparent, use these settings:
- Format: QuickTime
- Channels: RGB + Alpha
The "Alpha" channel preserves transparency, allowing you to overlay the graphic onto your video footage. Render the file, and you have a professional-grade lower third ready for any project.
Take Your Content to the Next Level with Flexwork
Learning how to create motion graphics is a valuable skill, but the DIY approach can be a significant drain on your time and resources. The steep learning curve, expensive software, and endless render times pull you away from what you do best: creating high-impact content and growing your brand. This is the friction point where creative vision meets technical reality, leading to burnout and inconsistent quality.
Flexwork Studios exists to bridge this gap. We provide the expertise, technology, and streamlined workflow to produce the polished, professional content you envision, without the DIY struggle. Your energy is your most valuable asset; it should be invested in your message, not in wrestling with keyframes.
A Smarter Path to Premium Content
Imagine walking into a professional studio for a single day and leaving with a month’s worth of high-quality, branded content. This is the reality of our Content Day package. For $3000, you receive a full day in our broadcast-quality studio to record your core video and audio. Afterward, our production team transforms that footage into 20 professionally edited reels or 60 pro photos, complete with custom motion graphics that align with your brand. It’s a system designed for ambitious creators who value consistency and quality.
The data supports this approach. Video content with motion graphics generates up to 1,200% more shares than text and static images combined. Marketers continue to invest heavily in motion because it boosts message retention and keeps viewers engaged. To learn more, discover more insights about motion graphics and video marketing and see the data for yourself.
Your Strategic Production Partner
For creators ready to build a true media brand, our Market, Manage & Produce My Podcast package is the ultimate solution. Starting at $1500 per episode (with a 20-episode commitment), this service integrates stunning motion graphics into a comprehensive production and marketing engine for your show. We handle the technical heavy lifting—animation, post-production, and strategic distribution—freeing you to focus on your role as the visionary and executive producer.
When you partner with Flexwork, you are not just purchasing a service; you are investing in a proven production system. You gain access to a team of experts, state-of-the-art equipment, and a process fine-tuned to deliver premium quality, episode after episode. We handle the details so you can focus on the big picture. Our professional video podcast studio provides an ecosystem designed for creative excellence and audience growth.
Frequently Asked Questions
Navigating the world of motion graphics can feel overwhelming at first. Here are answers to some of the most common questions we hear from creators.
How long does it take to become proficient in motion graphics?
You can learn the basic tools in a program like After Effects in a few weeks of dedicated practice. However, progressing from basic competence to creating professional-grade work that elevates your brand requires hundreds, if not thousands, of hours. This significant time commitment is why many successful entrepreneurs and creators choose to partner with a production studio, gaining immediate access to expert-level quality.
Is expensive software a requirement?
While professionals typically use the Adobe Creative Cloud suite, you can begin learning with powerful free tools like Blender. The true costs are not software subscriptions but time and hardware. The time investment required to become proficient is immense, and professional motion graphics demand a powerful computer to handle complex projects. For most creators, outsourcing to a studio with the necessary gear and talent is a more strategic and cost-effective decision.
What are the essential motion graphics for a podcast?
For video podcasts, three core assets provide the most significant impact on production value:
- A Branded Intro and Outro: These elements frame your content, establishing a professional tone from the start and reinforcing your brand identity.
- Animated Lower Thirds: Essential for introducing hosts and guests or highlighting topics, these graphics add a layer of polish that static text cannot achieve.
- Dynamic Social Media Clips: These turn your best audio moments into eye-catching, shareable videos, perfect for driving engagement on platforms like Instagram and TikTok.
These three assets are foundational to the premium production packages offered at Flexwork Studios.
Can I create motion graphics on my laptop?
You can certainly learn the fundamentals and create simple animations on a modern laptop. However, you will quickly encounter limitations when working with more complex projects, 4K video, or detailed effects. A standard laptop will struggle with slow render times, choppy previews, and potential system crashes. Professional work requires a high-performance workstation with a powerful processor, a dedicated graphics card, and abundant RAM—the exact type of equipment available to you at our studios.
Ready to bypass the learning curve and equip your podcast with stunning, professional-grade motion graphics? The team at Flexwork Studios is your dedicated production partner. Explore our packages and book a studio tour to see how we can elevate your brand. Find out more at https://flexworkstudios.com.